Create a Medical Device Certificate to Foreign Government (CFG) Application
April 2025
Return to Online Registration1
Table of Contents
- Create a Medical Device Certificate Application
- Navigation
- Section 1 Requestor Information
- Section 2 Manufacturer Information
- Section 3 Distributor Information (if applicable)
- Section 4 Product Information
- Section 5 Was the product ever recalled?
- Section 6 List country(ies) for which the Certificates are requested
- Section 7 Indicate what product information should appear on the certificate
- Section 8 Should the country destination be listed on the certificate?
- Section 9 Exporter's Certification Statement
- Review Screen
Create a CFG Application
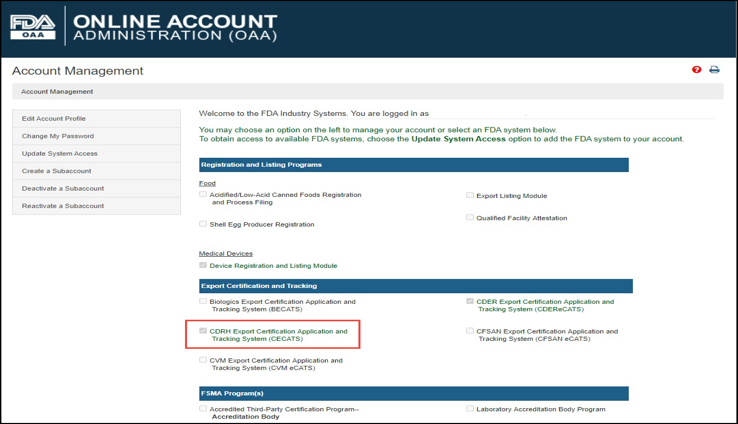
Log into the FDA Industry Systems (FIS) https://www.access.fda.gov and select "CDRH Export Certification Application & Tracking System" from the list of systems available on the FURLS Home Page as shown in Figure 1.
Figure
1: FDA Industry Systems Page
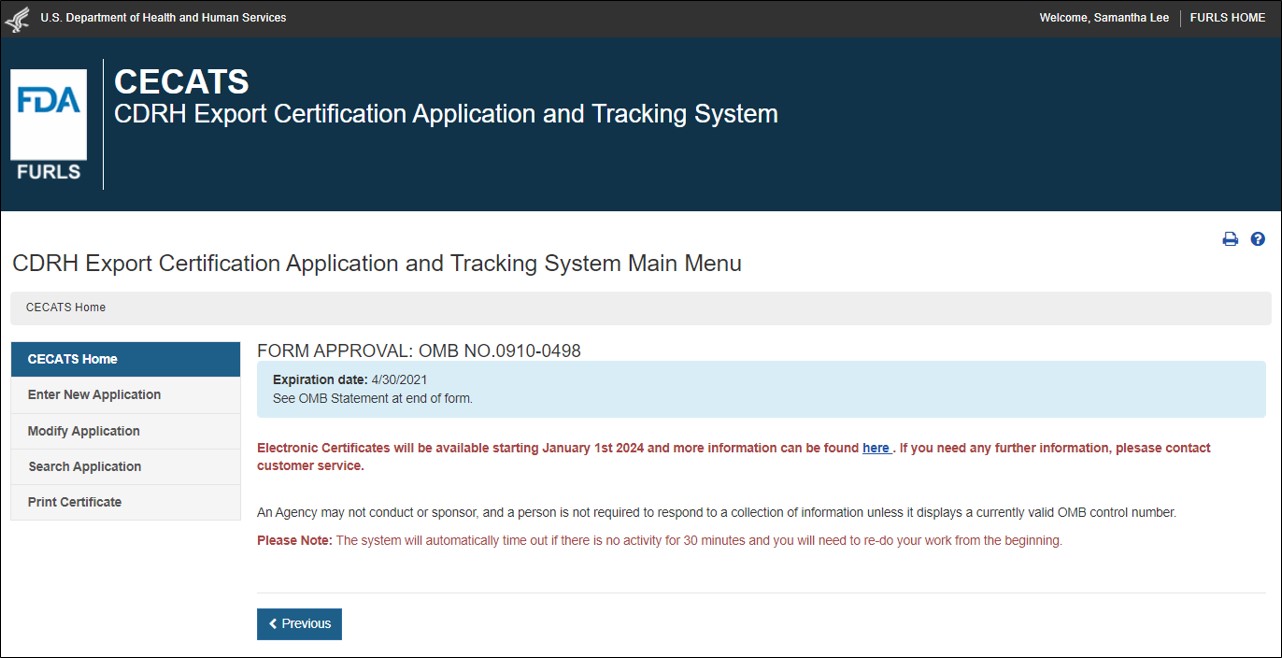
Select “Yes” in response to the question “Will the devices be exported from the United States?”. Select “Continue” and the system will open the CECATS Home Page. The CECATS Main Menu page is shown in Figure 2 below:
Figure
2: CECATS Main Menu
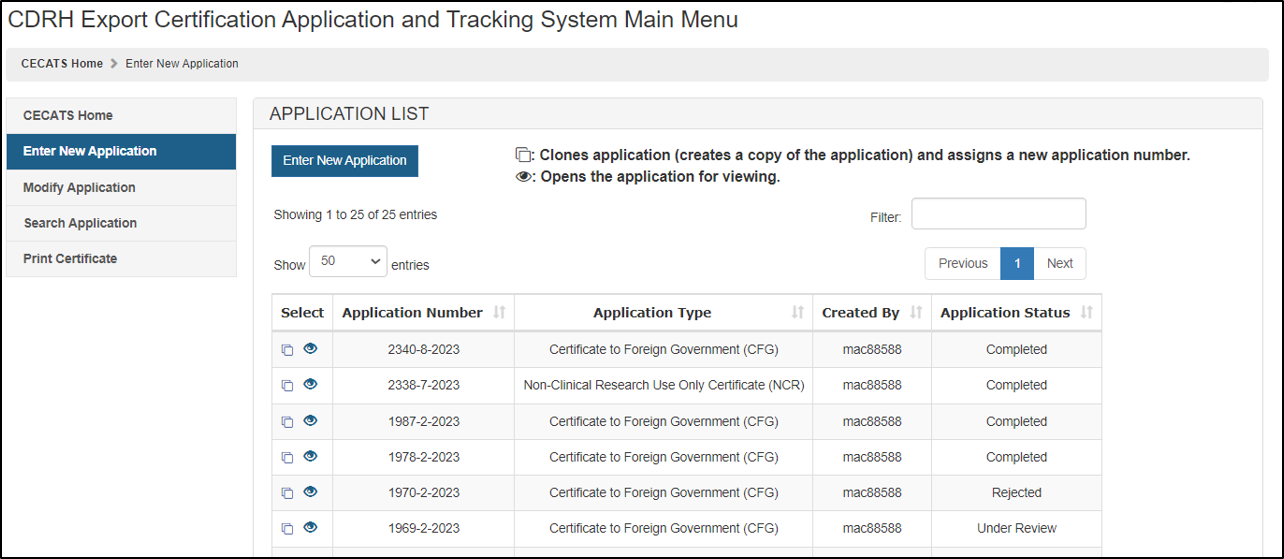
To create a new application, click "Enter New Application". All of the applications you have saved or submitted will be displayed as shown in Figure 3 below. Applications that were saved, but not submitted will be in "Draft" status until you submit them.
- To create a new application, click "Enter New Application" from the main Menu Page and then Click on "Enter New Application" again.
- To continue working on a draft
application,
click on Pencil icon (Edit)
 icon associated with the desired application.
 - To clone a
previous application, click on the double book icon (Clone)
 icon associated with the desired application.
 - Verify the information on each page is still correct and continue through all screens.
Click Modify Application to make changes which are in a submitted, but not yet in “Under Review” status or cancel an application that has been submitted and/or is under review.
The following options are available:
- Modify application based on a notification received
- Update the number of certificates
- Cancel request
To search using the application number, click Search Application. This option may be used to continue working on a draft application,clone a previous application, or make corrections to an application that is in 'Return for Action' status.
NOTE: Return for Action status indicates that upon review of the application by the FDA, additional information or clarification was required. CECATS will send an email to the requestor with comments from the reviewer and will provide a 48 hour window for modifications to be made. If modifications cannot be made within 48 hours, the status will automatically change to "Incomplete". Please clone, modify, and submit the application when it is ready. A new application number will be assigned. No charges are incurred for an application unless certificates are issued.
NOTE: For all applications in a 'Draft' status, if you do not perform any activity within 30 days, the status will automatically change to 'Not Submitted'. Please clone to continue.
Figure
3: Submitted and Draft Application View
The Center for Devices and Radiological Health (CDRH) issues several types of Export documents. When creating a new application, select Certificate to Foreign Government (CFG) as shown in Figure 4.
Figure
4: Application Type
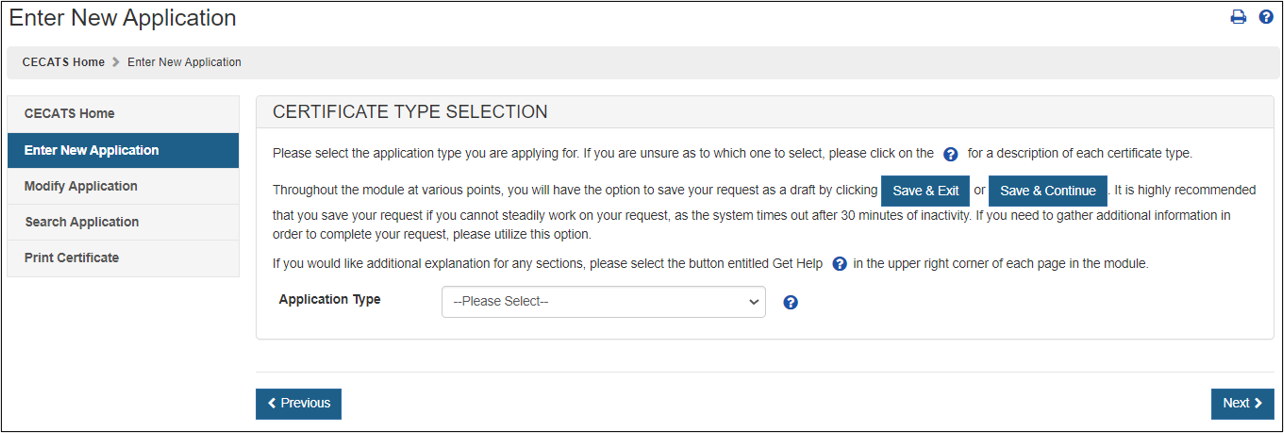
Description of a Certificate to Foreign Government:
For a description of each application type, select the question mark icon located next to the Application Type dropdown list shown in Figure 4 above.
Certificate to Foreign Government (CFG)
A Certificate to Foreign Government is issued for legally marketed devices in the United States that are in compliance with the requirements of the Federal Food, Drug, and Cosmetic Act (FD&C).
Eligibility Note:
- Are cleared or approved by FDA for marketing in the U.S.
- May be legally commercially distributed in the U.S.
- May be a Class I, II, or III device
- Are listed with the FDA
- All devices must be exported from the United States
Acceptable CFG Marketing Statuses: 510(k), PMA, Enforcement Discretion, Exempt, Pre-amendment, Humanitarian Device Exemption (HDE), or Product Development Protocol (PDP) and DeNovo.
Navigation
A status bar at the top of every page will track your progress through each step of the application process as shown in Figure 5 below.
Figure 5: Navigation Bar

A "Get Help" icon, located at the top right of each page, will provide page specific help. For an overview of all help files available, please refer to the FDA Industry Systems Index of Help Pages at https://www.access.fda.gov/cecats/help/template.html.
Also located in the top right corner of each page, is a "FURLS HOME" link that will take you to the FURLS Home Page. The "CECATS HOME" link will take you to the CECATS Home Page (Refer to Figure 2). To log out of the system, select "FURLS HOME" and click on "Logout".
At the top and bottom of each screen are navigation buttons as shown in Figure 6 below.
Figure 6: Navigation Buttons
![]()
- Previous -Navigates back one screen or back one step. Information entered on the current screen will NOT be saved if you select the "Previous" button.
- Save & Exit– Information entered up to this point will be saved. Your application will be set to a "Draft" status until you complete and submit the application. If you do not perform any activity for 30 days, the system will automatically change the status to "Not Submitted" and may delete the application. When you log into the CECATS system, all applications in a "Draft" status will be displayed after selecting the "Enter New Application" option from the main menu.
- Save & Continue– Information entered up to this point will be saved in "Draft" status. An application number will be assigned when you click on the "Save and continue" button the first time and this number shall be visible on the top of the screen until the application is submitted. Please keep the Application number for your records and for any communications with FDA regarding this application. Your application will be set to a "Draft" status until you complete and submit the application. If you do not perform any activity for 30 days, the system will automatically change the status to 'Not Submitted' and may delete the application.
- Next - All information is saved on the current screen and navigates to the beginning of the next step. However, exiting CECATS without using the "Save & Exit" button will cause the loss of the entire request.
NOTE: All Fields are mandatory except those marked as "Optional" in parenthesis. You will NOT be able to proceed to the next step or Save & Exit until all mandatory fields have been properly entered on the current screen.
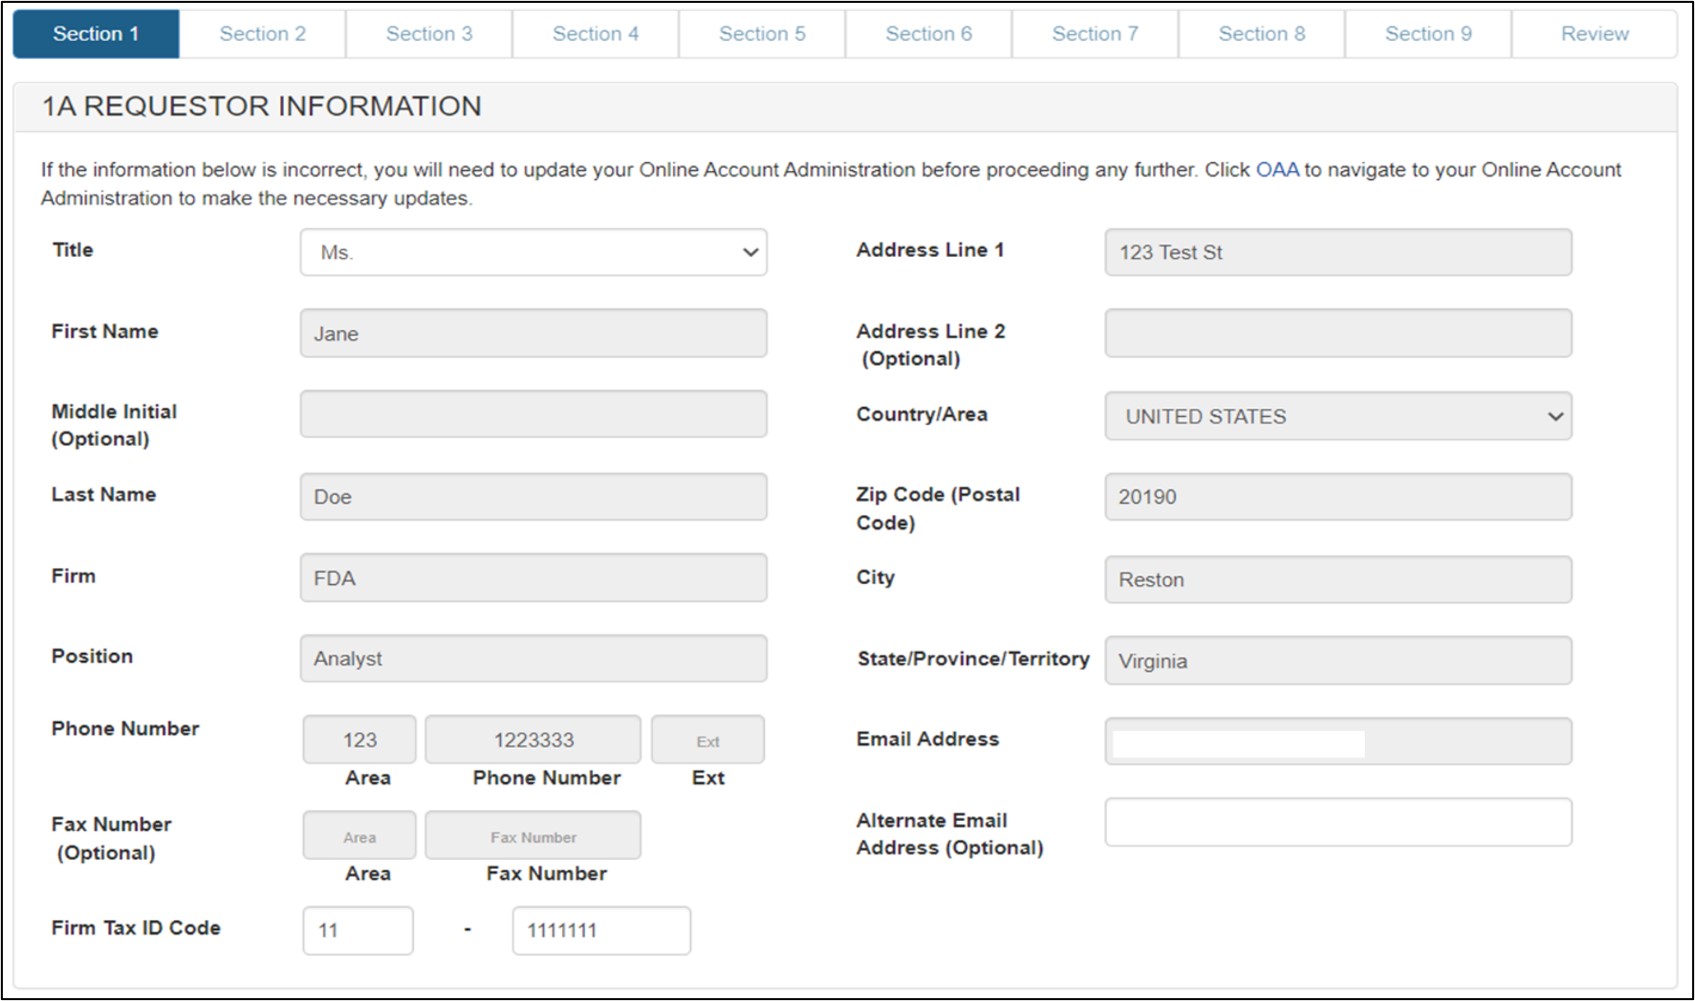
Section 1 - Requestor Information
The system auto-populates specific information from your Online Account Administration (OAA) into section 1 (Requestor Information) of the application. These fields cannot be edited in CECATS.
If the information is incorrect, click the "FURLS Home" link in the upper right of the page. Then click the "Edit Account Profile" on the left-hand side and update your account profile accordingly.
The following two fields are required in section 1:
- Title
- Firm Tax ID Code (also referred to as the Employer Identification Number or EIN (a nine-digit numeric value). This number is assigned by the Internal Revenue Service (IRS).
Click "Next". See Figure 7 below:
Figure 7: Section 1 - Requestor
Information
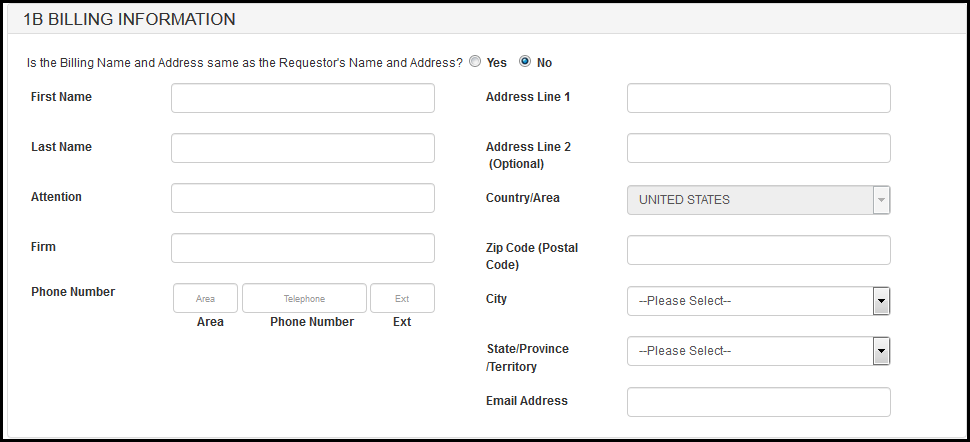
In section 1B: "Is the Billing Name and Address same as the Requestor's Name and Address?" If you select "Yes", you have the option to enter an alternate addressee in the "Attention" field. If you select "No", you may enter an alternate billing address in the fields provided. See Figure 8 and 9.
Figure 8: Section 1B - Billing Information

Figure 9: Section 1B - Billing Information
Address Validation screen, please click "Accept validated address and continue"
to indicate you (the requestor) are still located at the location identified. You will identify
the manufacturing facility's address, later in the process. Click "Next" to proceed. See Figure 10
below.
Figure 10: Address Validation

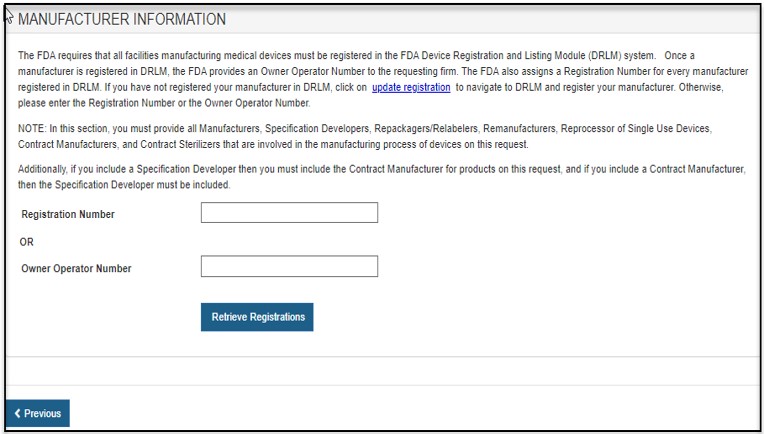
Section 2 - Manufacturer Information
FDA requires that all facilities manufacturing medical devices must be registered in the FDA Device, Registration and Listing Module (DRLM). Once a manufacturer is registered in DRLM, FDA provides an Owner Operator Number (OON) to the requesting firm. FDA also assigns a Registration Number for every manufacturer registered in DRLM. If you have not registered your manufacturer in DRLM, return to the FURLS home page and register your manufacturer in DRLM. Otherwise, please enter the Registration Number or the OON.
NOTE: In this section, you must identify all Manufacturers, Specification Developers, Repackagers/Relabelers, Remanufacturers, Reprocessor of Single Use Devices, Foreign Exporters, Contract Manufacturers, and Contract Sterilizers that are involved in the manufacturing process of devices on this request.
Additionally, if you include a Specification Developer then you must include the Contract Manufacturer for products on this request. Conversely, if you include a Contract Manufacturer, then the Specification Developer must also be included.
Enter the Registration Number or the Owner Operator Number (OON) and click on the "Retrieve Registration" button. See Figure 11.
Figure 11: Registration Number or OON for
Manufacturer
Owner Operator number (OON) entered:
As long as the OON is active, all facilities associated with the OON will be
displayed. Select one or more facilities (if applicable) from the list of
manufacturers that are in active status as shown in Figure 12 below. Inactive
facilities will be grayed out and cannot be selected.
Registration number entered:
Only the single facility associated with that number will be displayed.
Figure 12: List of Manufacturers
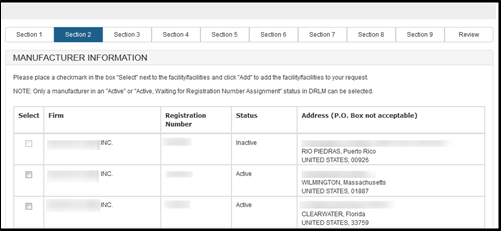
A facility may be entered only one time in section 2.
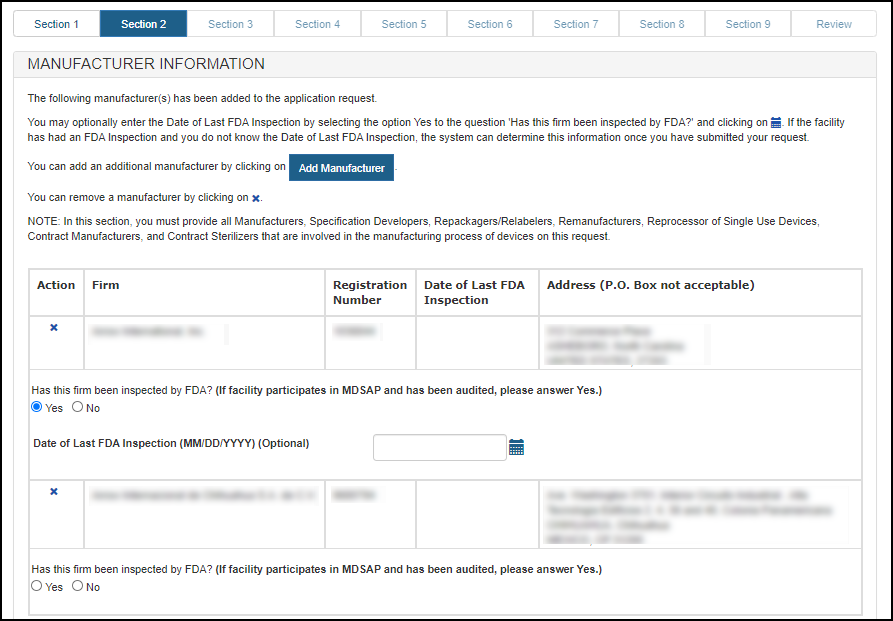
After selecting the manufacturer(s), a review page for all manufacturers selected as shown in Figure 13.
Figure 13: Review Manufacturer List
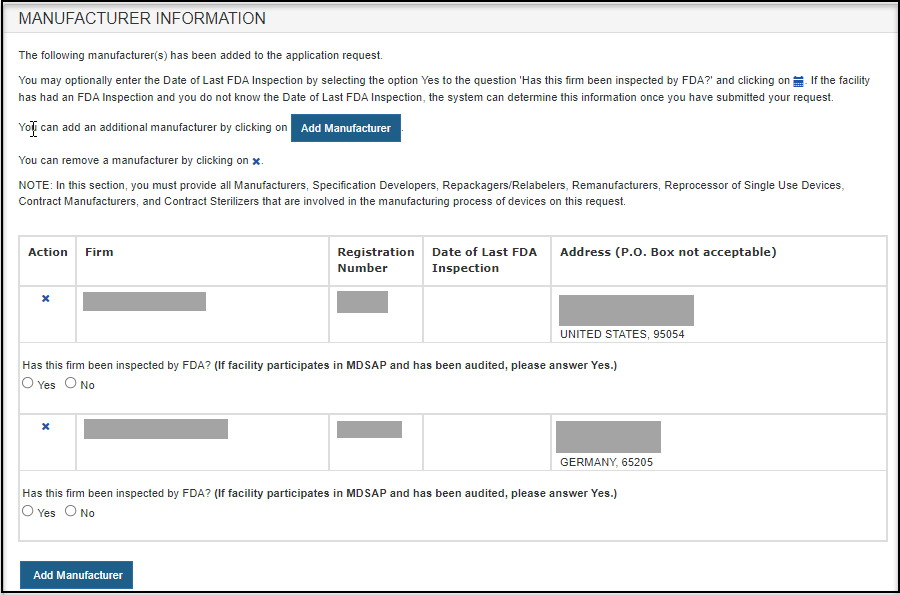
Select the radio button to answer "Has this firm been inspected by FDA? (If facility participates in MDSAP and has been audited, please answer YES.)"
To add additional manufacturer(s), click "Add Manufacturer".
To remove a manufacturer from the list, select the facility, click on the "X" icon and verify by selecting the "OK" button.
Optional: If you select "Yes" for the question "Has this firm been inspected by FDA?", then you may enter the Date of Last FDA inspection. See Figure 14 below.
Figure 14: Manufacturer Information
Once you have completed selecting all manufacturers, click "Next".
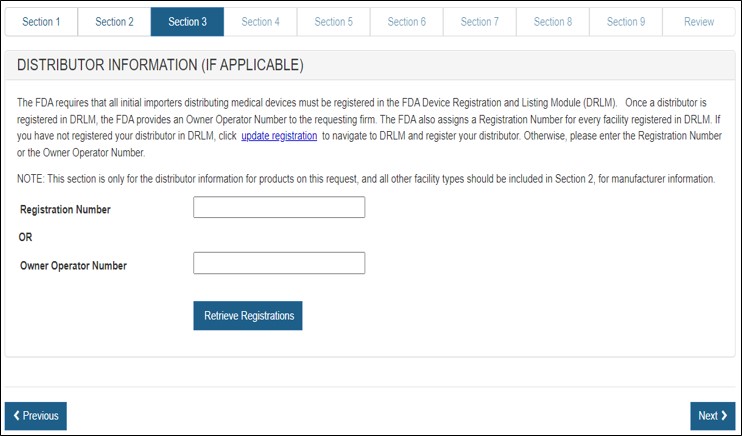
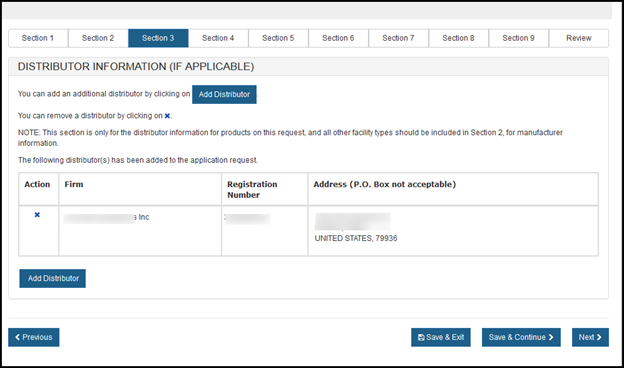
Section 3 - Distributor Information
In section 3, you have the option to enter one or more Distributors to your request. This is the U.S. establishment that exports the devices from the United States. Do not include foreign distributors.
Enter the Registration Number or the Owner Operator Number (OON) and click on "Retrieve Registrations". See Figure 15 below.
Figure 15: Registration Number or OON
for Manufacturer
Similar to the section 2, the establishment information will appear. If correct, click the facility and click "Add". If not correct, click "Previous". See Figure 16 below. Multiple distributors can be added.
Figure 16: Distributor List
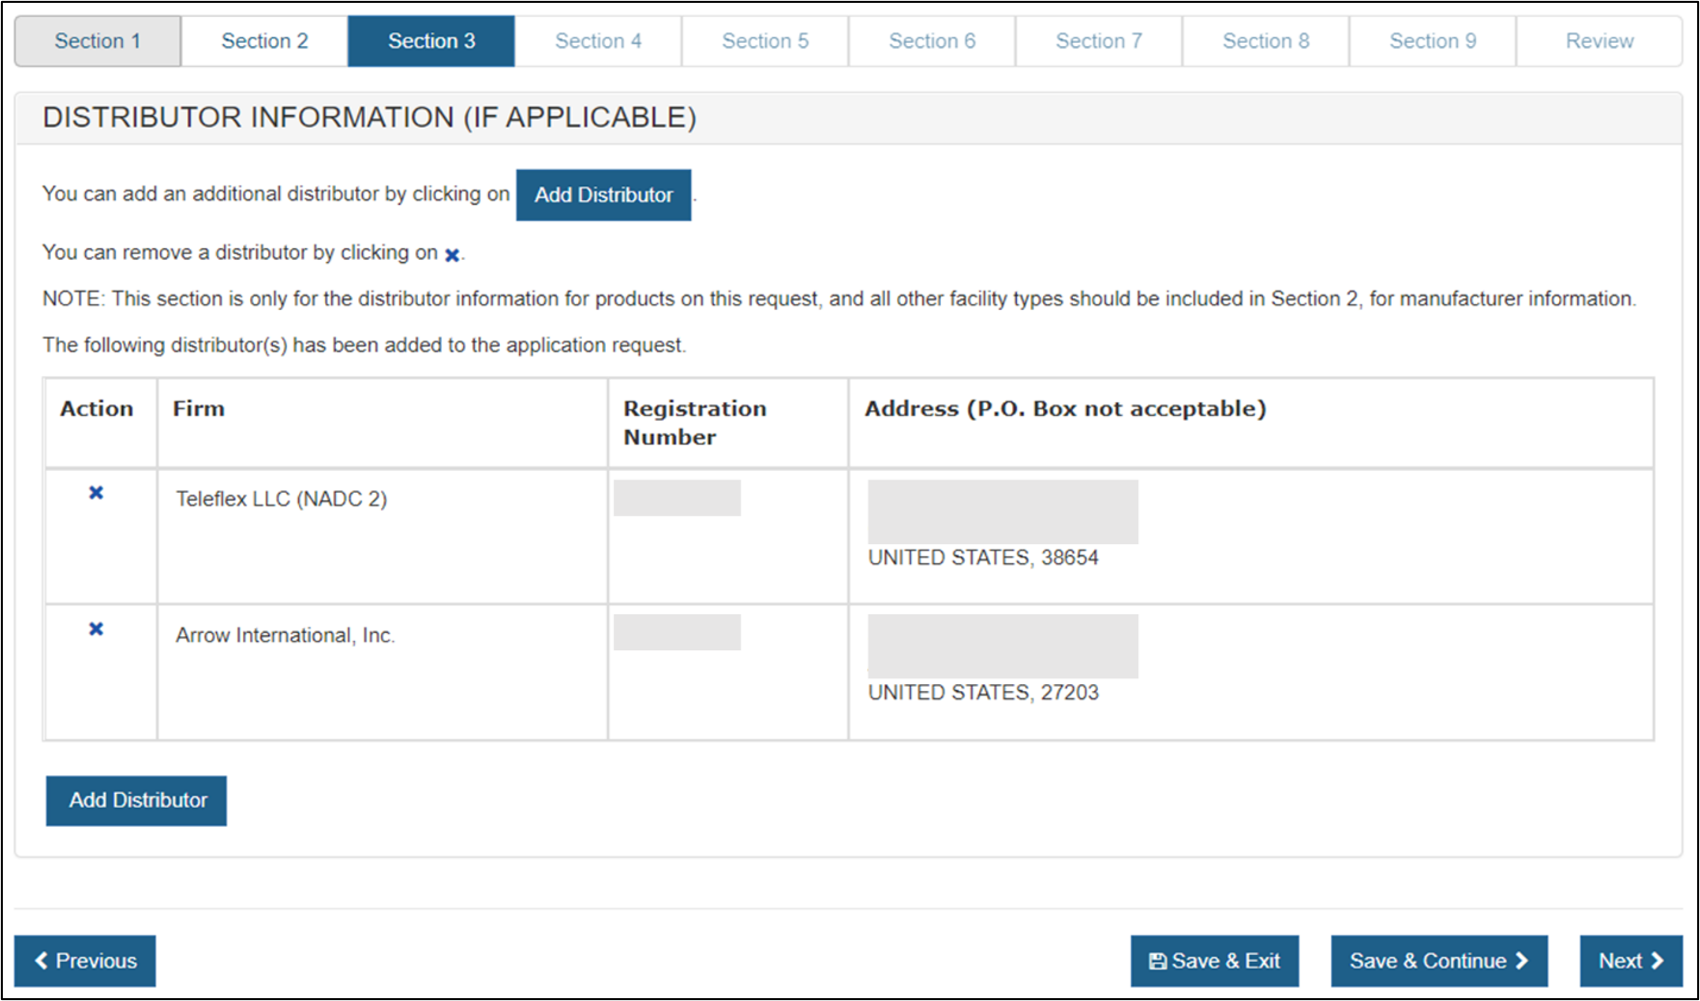
NOTE: All distributors must have a U.S. Address. If you do not add a distributor in section 3, at least one manufacturer must have a U.S. Address. You will not be able to proceed to section 4 unless one manufacturer or distributor has a domestic address.
To add another distributor, click "Add Distributor".
To remove a distributor from the list, select the facility, click on the "X" icon, and verify by clicking the "Ok" button.
After all distributors have been identified, click on "Next".
After selecting the distributor(s), a review page of all distributors selected will be displayed as shown in Figure 17.
Figure 17: Review of Distributor List
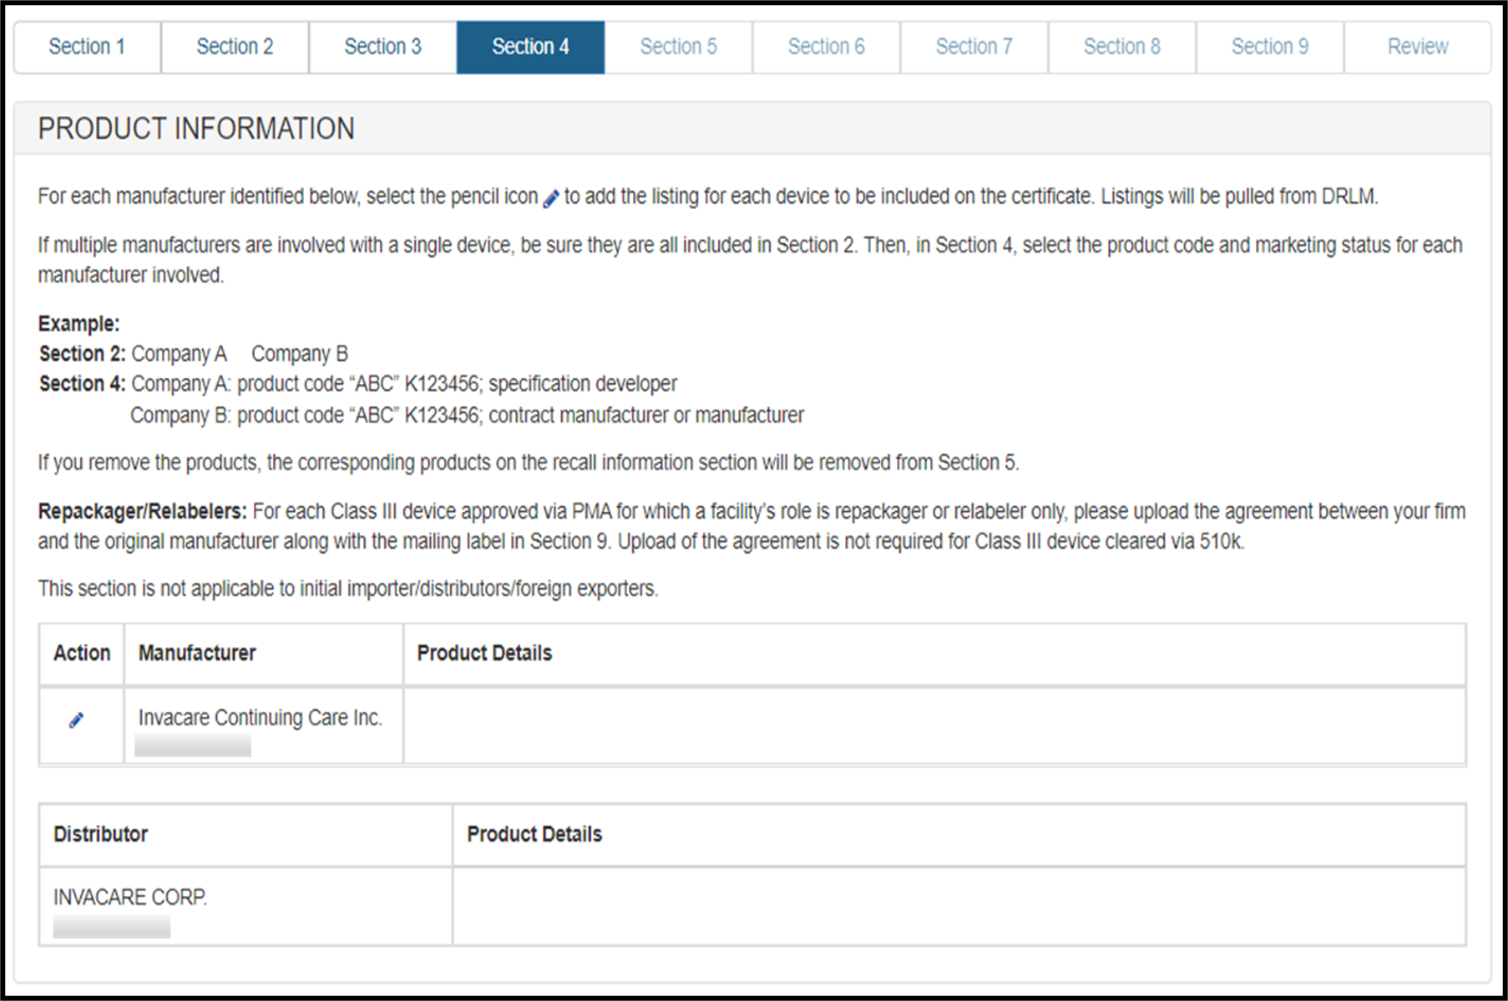
Section 4 – Product Information
In this section, you will be able to select one or more products from each manufacturer identified in sections 2.
- Class III products may be included only if all of the manufacturing facility(ies) have been inspected by the FDA.
- Refurbished or remanufactured product may be listed on this application if the facility you represent is the original manufacturer. Additionally, the products must be identified as refurbished or remanufactured on the certificat as shown in Figure 18 below.
Figure 18: Product Information
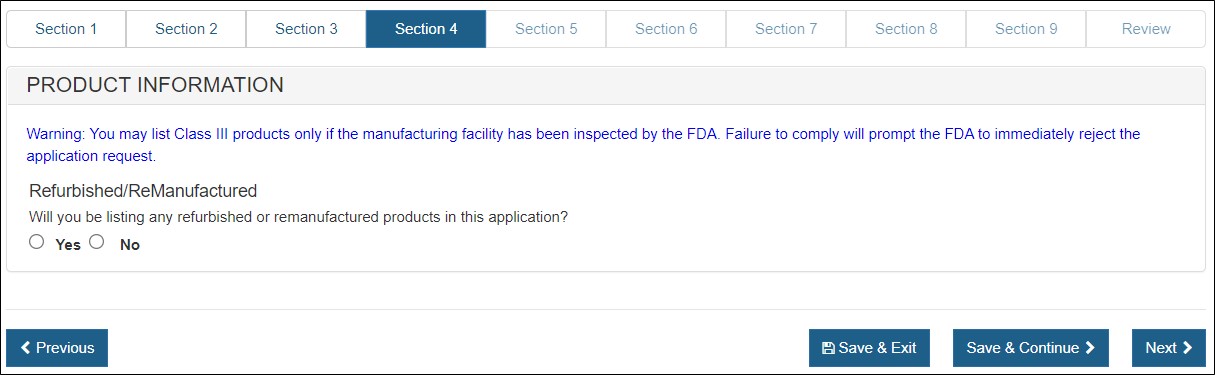
Select "Yes" or "No" to the question(s) regarding refurbished or remanufactured products.
A list of the manufacturers and distributors will be displayed as shown in Figure 19 below.
Figure 19: Product Information Listing
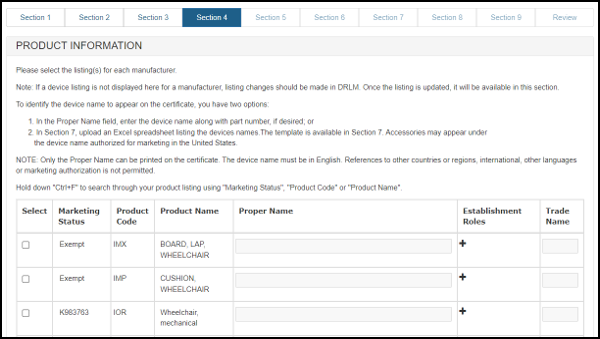
NOTE: You must add at least one product for each manufacturer.
Add Products
To add a product, first click on the Pencil icon associated to the manufacturer. The product listings for that manufacturer (from DRLM) will be displayed. Select all the products for this facility that are to be included on the certificate.
To view the establishment roles click on the "+". Establishment roles are the manufacturing role(s) that a facility has identified for a device when the listing was added in registration.
- In instances where a device being included on the certificate has more than one facility involved in manufacturing of the device, all manufacturers should be identified in section 2. Then in section 4, the listing for the device should be chosen for each manufacturer.
- The establishment roles should correspond to each other. For example:
A device designed by a specification developer, but produced by a contract manufacturer, and sterilized at another facility should have a facility with the role of specification developer, PLUS a facility with the role of contract manufacturer, PLUS a facility with the role of contract sterilizer (if applicable) in section 2, and all 3 manufacturing roles should also be reflected in section 4. - If a role is missing or appears inaccurate, contact the facility to modify its registration to reflect the appropriate role.
- Additionally, if a role is missing, an error message identifying the device info (product code, the establishment role included for a facility, and the role that is still needed) will be generated.
- To correct the error:
- Add the facility that plays the missing role to section 2 and then select the listing in section 4.
- If the facility is already on the application, select the appropriate device and role in section 4. If the available options in section 4 do not reflect the correct role or the listing is missing, contact the facility to modify its registration in the Registration and Listing module. Then return to CECATS to complete the application.
- CECATS will prevent access to section 5 until all errors in section 4 have been corrected.
IMPORTANT: If any product is not listed on the facility's establishment registration, the facility will need to update their DRLM registration before you can continue.
At this point, you have an option regarding the addition of the product name. You can either enter the name of the devices exactly as you want it to appear on the certificate in the "Proper Name" block as shown in Figure 20 below OR you can proceed through the application to Section 7 and upload a Product List. If you would like to include product codes or parts/accessories to the product listing, do not indicate a "Proper Name" in this section. Instead (in section 7), upload the product information using the formatting outlined in that section.
To avoid the device name appearing on the certificate more than once, list the "Proper Name" of each device only once - even if multiple firms have listings for the same device.
Figure 20: Selecting the Product
To remove a selected product from a facility, click on the edit icon/ pencil icon associated to the facility and deselect the box associated to the product and click "Next".
Once all products have been selected, click "Next".
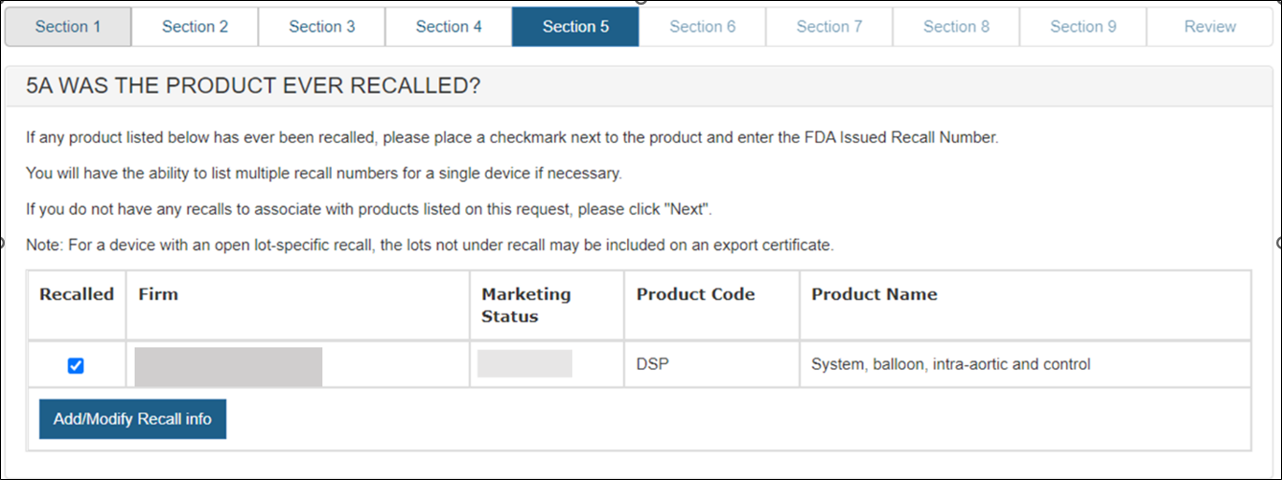
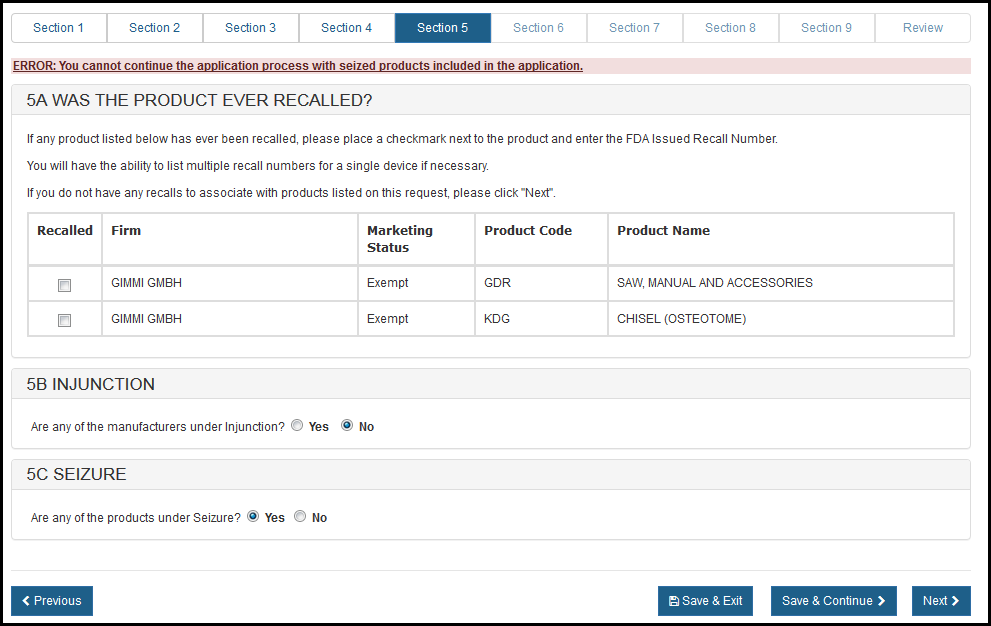
Section 5A – Was the product ever recalled?
All recalls (both open and closed) that have occurred within the past ten years for any product on the application must be identified.
After selecting the checkbox next to the product, a new button will appear. Click on the "Add/ Modify Recall Info" button as shown in Figure 21.
Figure 21: Selecting a Product that has
been recalled
Enter the following Recall Number information:
- FDA Issued Recall Number
- Close-out Date
- Internal Reference Number, if no FDA recall number has been issued yet.
NOTE: The format of the recall number is Z-XXXX-YYYY. Please enter the eight-digit number as shown in Figure 22 below.
Figure 22: Selecting a Product that has been recalled

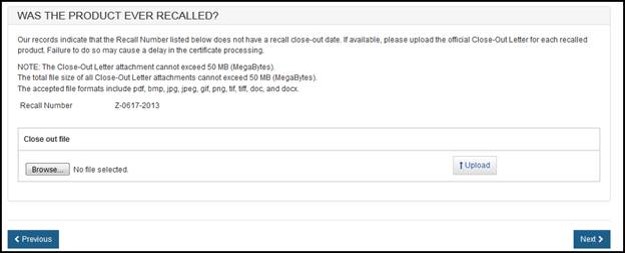
Click "Next" and the system will validate the recall number. If the number is valid, the Close-out Date field may get auto-populated.
If no Close-out Date was found for the recalled product, an option to upload the official Close-out Letter (from the FDA) will be provided. Please do not upload your firm's letter to the FDA. The accepted file formats include the following: pdf, bmp, jpeg, gif, pang, tiff, doc, and docx.
To upload the FDA Close-out letter, click "Browse…" and navigate to the file on your computer as shown in Figure 23 below.
Figure 23: Upload FDA Close-out Letter
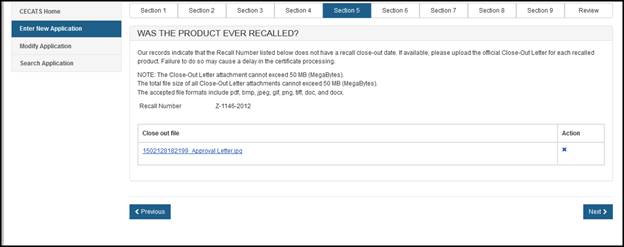
Select the file and click "Upload". The uploaded file link will be displayed as shown in Figure 24 below. To remove the attachment, simply click "X" icon.
Figure 24: Selecting a Product that has been recalled
Section 5B – INJUNCTION
In section 5B, you will have to select the response for "Are any of the manufacturers under Injunction?". See Figures 25 - 26.
If you have selected the response as "No" then navigate to section 5C.
If you have selected the response as "Yes" then the system will display the list of Firms.
Figure 25: Section 5B - Injunction

Figure 26: Section 5B - Injunction
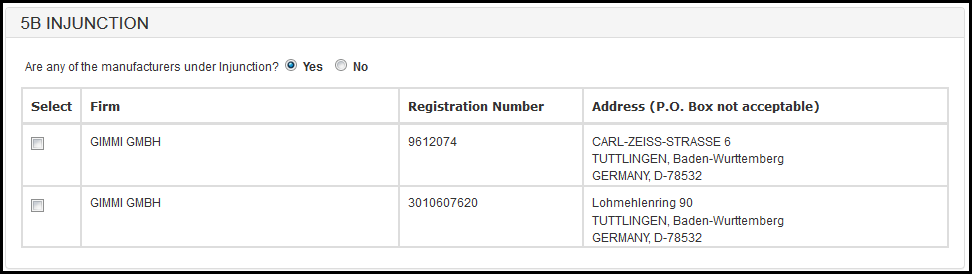
You will have to select the firms under "Injunction" and navigate to section 5C.
Section 5C – SEIZURE
In section 5C you will have to select the response for the question: "Are any of the products under Seizure?". See Figure 27 – Figure 29.
Figure 27: Section 5C - Seizure

If you respond "Yes" to the question, the system will display the error and you will have end the application process. See Figure 28.
Figure 28: Section 5A Was the Product Ever Recalled?

If you respond "No" then you will have to select the checbox to agree that no seized products included on this application. See Figure 29.
Figure 29: Section 5C - Seizure
Navigate to the next section.
Section 6 – List Country(ies) for which the Certificates are requested
Select one or more countries to indicate the product destination, click "Add" and repeat for additional countries as shown in Figure 30.
NOTE: Another method to select a country (other than scrolling down the list) is to first click on a country from the country list and then type in the first few letters of the desired country name. The system will jump to the country that begins with the letters typed.
Figure 30: List of Countries
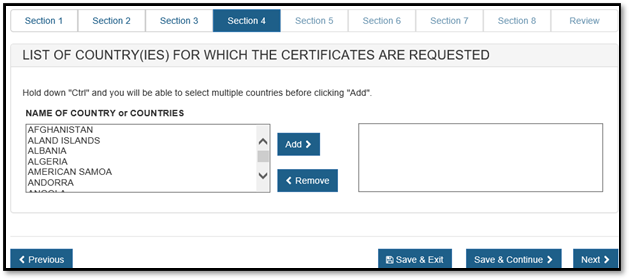
NOTE: The standard format of the electronic certificate will not display an individual country name, but will state "foreign countries". To display a specific country on the certificate, select only one country in section 6 AND indicate that country destination should be listed on the certificate in section 8.
Click "Next".
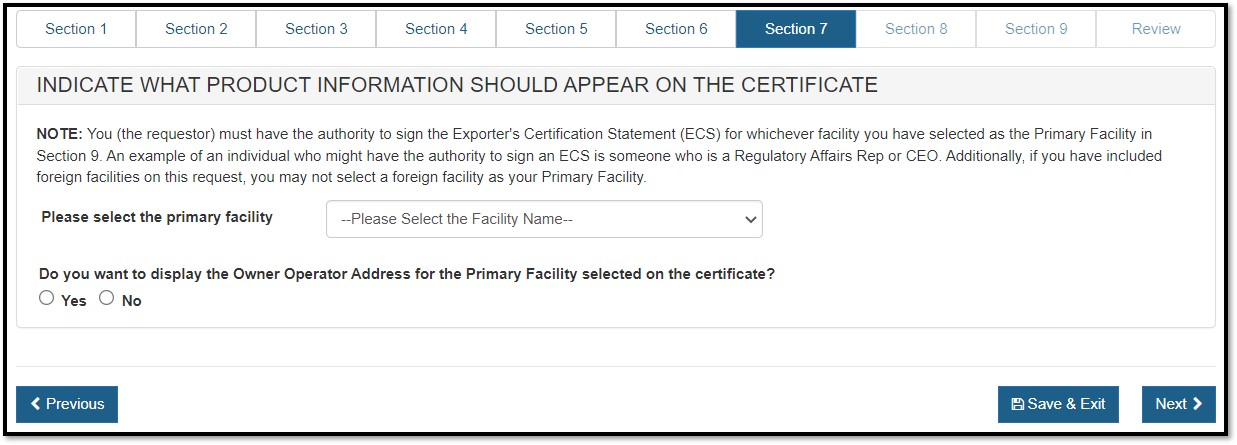
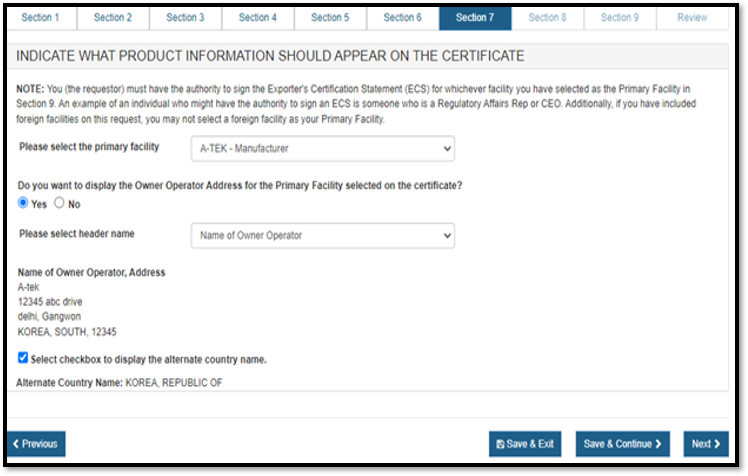
Section 7 – Indicate what product information should appear on the certificate.
Primary Facility: The primary facility is the facility which you represent. The primary facility must be a U.S establishment.
Click ![]() to view a
list of all U.S. facilities entered in sections 2 and 3 as shown in Figure
31 below. Select the name of the facility that you represent.
to view a
list of all U.S. facilities entered in sections 2 and 3 as shown in Figure
31 below. Select the name of the facility that you represent.
NOTE: By selecting the facility that you represent, CECATS will pre-populate the facility name in the Exporter's Certification Statement which you will sign towards the end of the application.
Figure 31: Primary Facility and OON
Address
Owner Operator:
For export certificates, the Owner Operator is a facility (Corporate Headquarters) that owns one or more registered manufacturer(s) or distributor(s) in DRLM. The owner operator cannot be identified with any manufacturing role since it does not have any manufacturing role identified in DRLM. The owner operator can only be identified as Owner Operator or Corporate Headquarters. The vast majority of export certificates do not include the owner operator.
NOTE: Only the Owner Operator of the primary facility may be included on the certificate.
To display the owner operator name and address for the primary facility, click "Yes" as shown in Figure 32 below. Select the appropriate Header Name from the dropdown list and click on "Next".
- Name of Owner Operator: appropriate if all of the establishments on certificate have the same owner operator in DRLM
- Manufactured for Owner Operator: appropriate if all of the establishments on certificate do not have the same owner operator in DRLM
- Name of Corporate Headquarters
If the Owner Operator has a foreign address, a checkbox is displayed "Select checkbox to display the alternate country name". If this checkbox is selected, the "Alternate Country Name" is displayed.
Figure 32: Display Owner Operator
Address on the Certificate
NOTE: If the owner operator name or address is incorrect, Save & Exit the application and update the address information in the Online Administration Account (OAA) from the FURLS homepage. When you reenter CECATS to complete the draft application, you may need to remove the primary facility from section 2 and then re-add it for the updated information to be retrieved from DRLM.
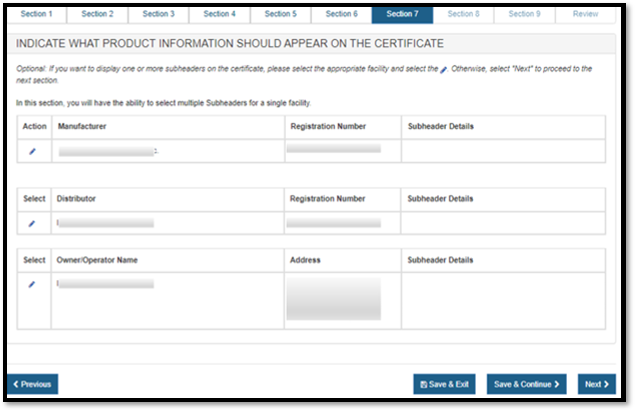
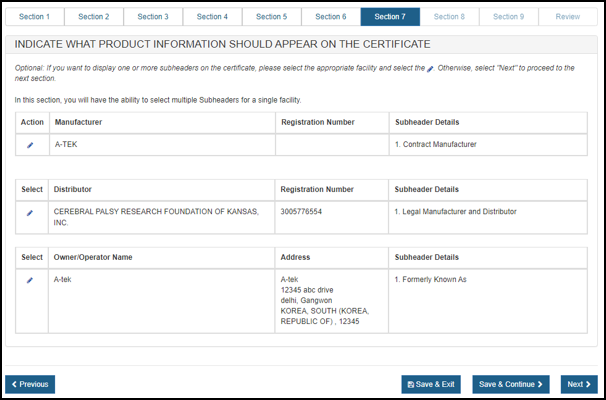
SELECTING THE FACILITY TO BE DISPLAYED ON THE CERTIFICATE
A list of all manufacturers and distributors entered in section 2 and 3 will appear as shown in Figure 33. Select each facility that you want to appear on the certificate.
NOTE: At least one domestic (U.S.) facility must be appear on the certificate.
Headers: For each facility, choose the Header that will be displayed on the certificate from the Header Name dropdown list as shown in Figure 33 below. If the same header is chosen, the facilities will be grouped together under the header.
Figure 33: Header Information
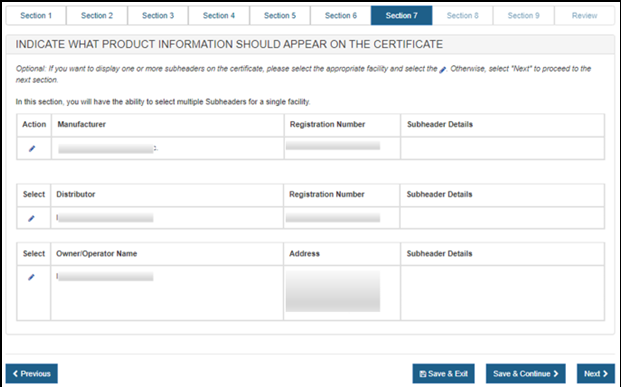
Subheaders: An option to identify the specific role an establishment plays in regard to the products is provided. Select the pencil icon beside the establishment and then select the appropiate subheader(s) (up to 3) to be displayed on the certificate. If the Owner Operator name is selected to display on the certificate, there is also an option to add a subheader.
Optional: One or more subheaders may be selected for each facility to be displayed on the certificate. Select the facility and click Pencil Icon as shown in Figure 34.
Figure 34: Subheader Information
Select the appropriate Subheader from the dropdown list and then click "Add" as shown in Figure 35 below.
Subheaders are optional. If no subheader is desired, leave as "—Please select—".
NOTE:For the Owner Operator Name, the only subheader available is “Formerly Known As”
Figure 35: Subheader Dropdown List
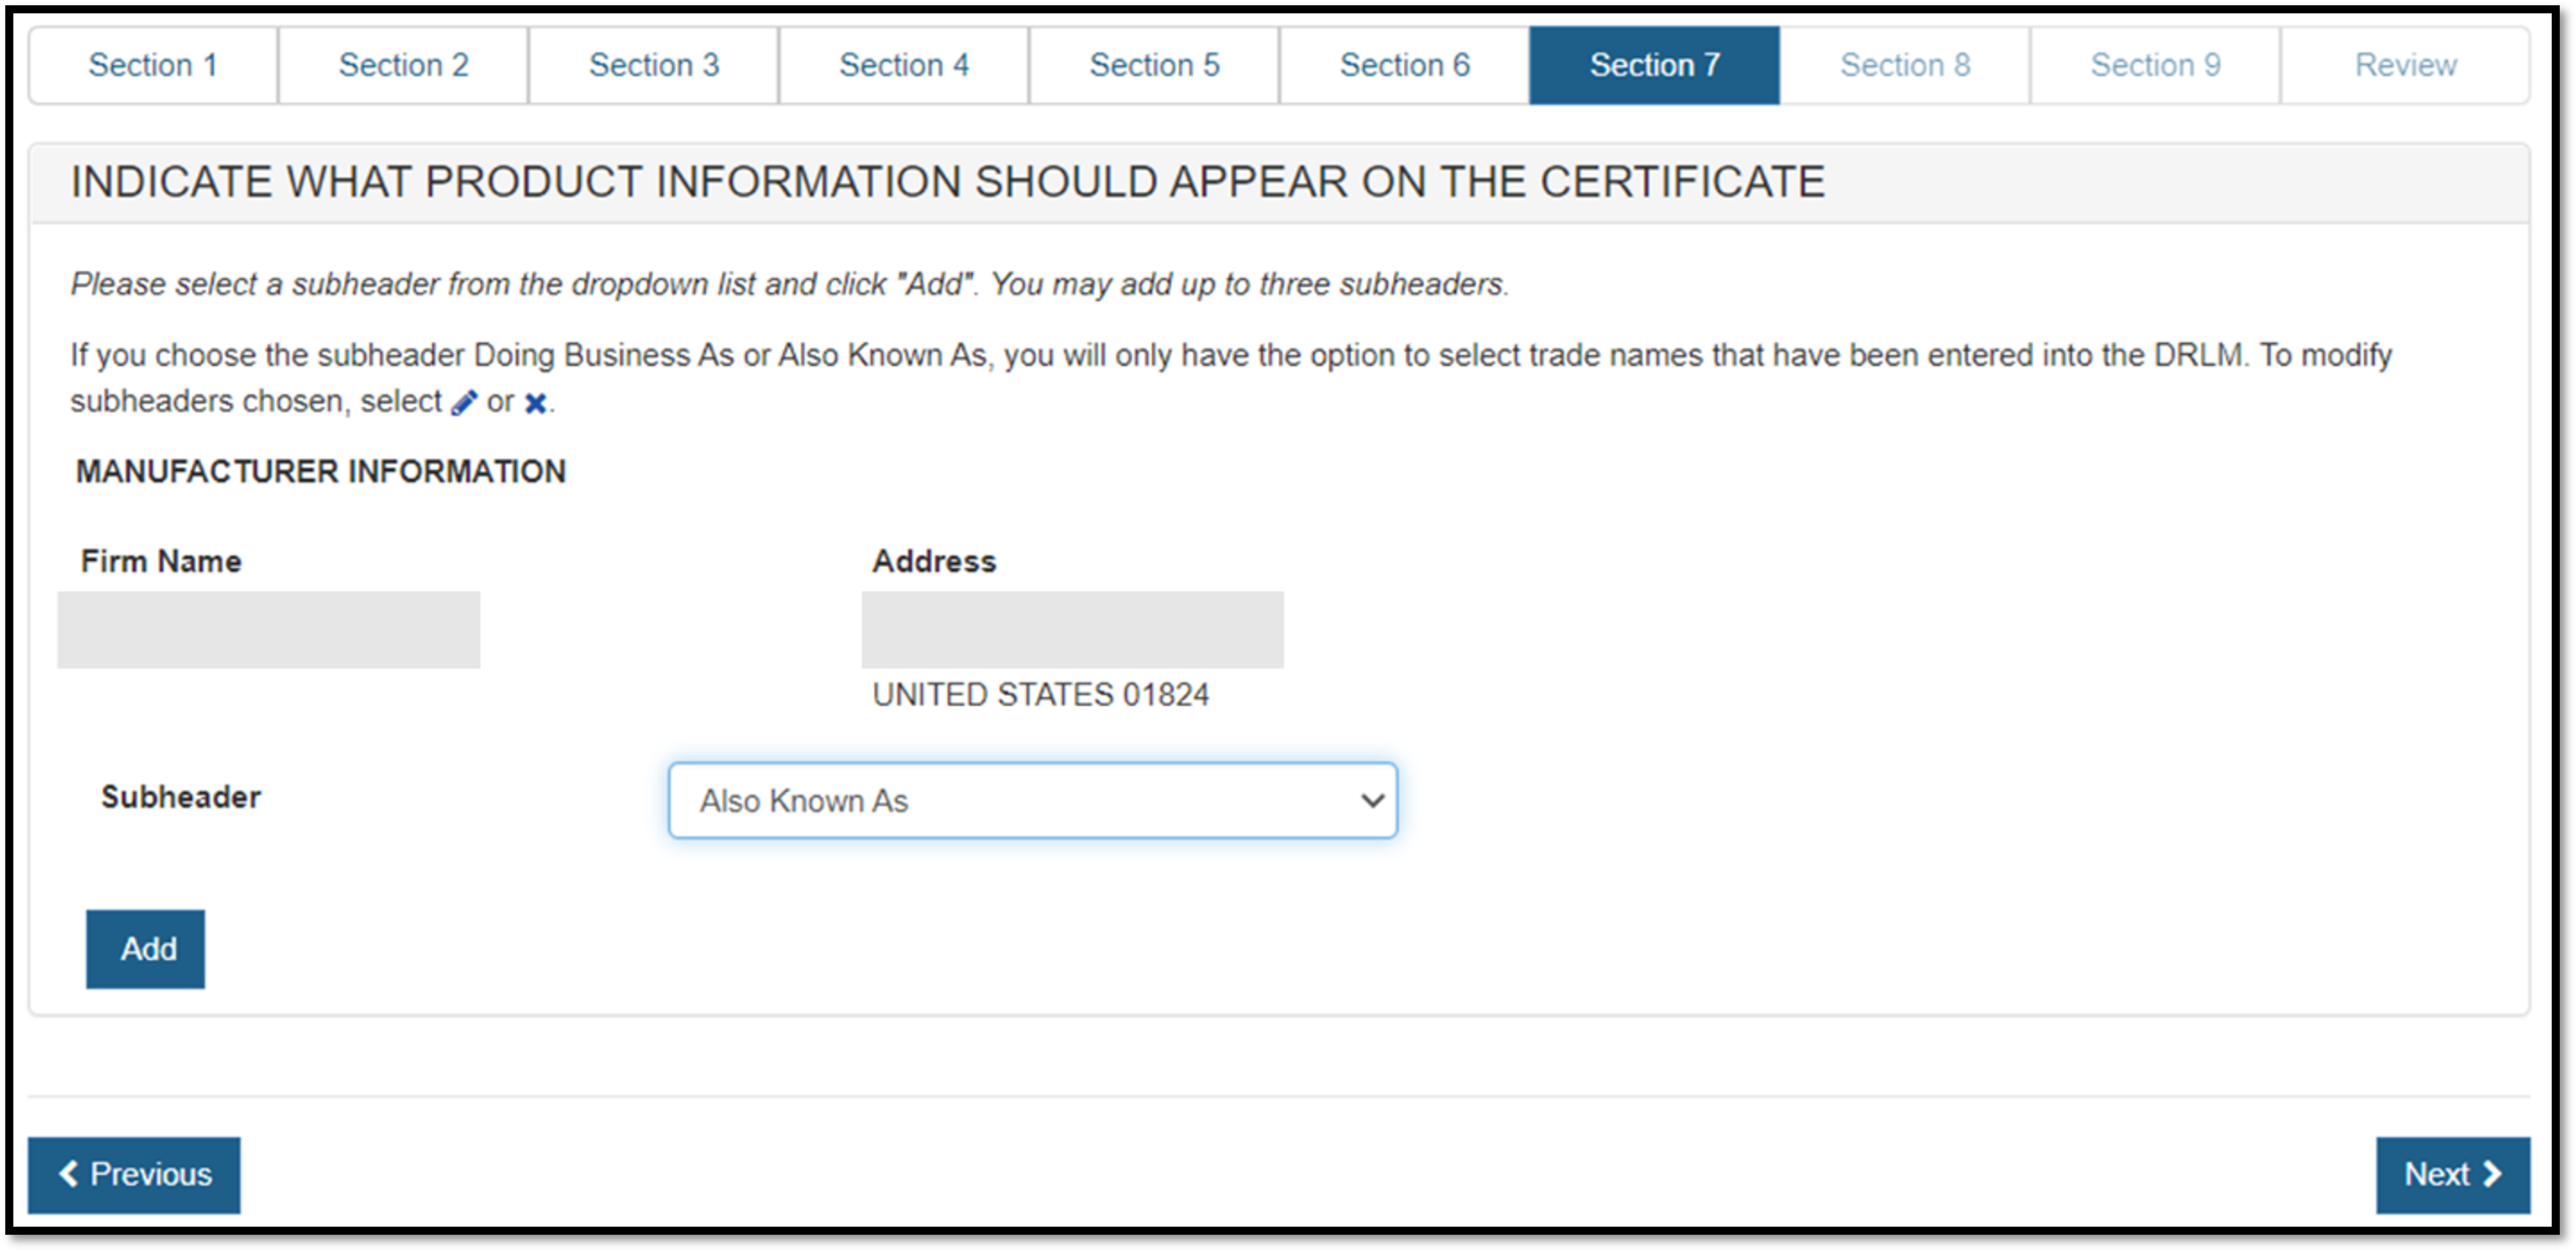
To remove the Subheader, click "X" icon.
Subheader Rules The following describes the Subheader rules:
- "Doing
Business As" (DBA): All DBA or trade names for the establishment in DRLM will be displayed and you
may choose one or more to be on the certificate. You will be given the option
to choose one of the DBA names as the establishment names, as well as if the
"Doing Business As" wording would appear.
- Formatting: The DBA information will appear after the establishment name.
NOTE: If CECATS does not show any DBA or trade names for the facility, the establishment registration must be updated to add a DBA name for the facility.
- Formatting: The DBA information will appear after the establishment name.
- "Also
Known As" (AKA)
and "Address Also Known As" (AAKA): Same basic function as described above for Doing Business As with Also Known As
replacing the Doing Business As wording.
- Formatting: The AKA information will appear after the establishment name.
- Formatting: The AAKA information will appear after the establishment address.
- Formatting: The AKA information will appear after the establishment name.
- "Lens
Finisher"
or "Lens Finisher Manufacturer": May only be chosen for the Primary
Facility. When prompted, type in both the name and address of the facility.
- Formatting: The establishment name and address will appear after all other establishment and Subheader information.
- "A
Division of" : When prompted, type in the division name.
- Formatting: This information will appear after the establishment name and after any DBA or AKA chosen, but before the address.
- "Formerly
Known As", "Manufactured for", "Made for", or "A
Wholly Owned Subsidiary of": When prompted, type in the Firm name and address, if desired.
- Formatting: Firm name(s) only - This information will appear below the establishment name and if applicable, below rule #2 and #4
- Firm name and address: this information will appear below the establishment name and address.
- "Previously
Manufactured at": When prompted, type in one or more Firm names and one address, if desired.
- Formatting: Firm name(s) only - This information will appear below the establishment name and if applicable, below rule #2 and #4
- Firm name(s) and single address: this information will appear below the establishment name and address.
- "Made
for": When prompted, type in the Firm name and address.
Option: Select "by" to add the word "by" on the certificate immediately following the firm's address.- Formatting:
- "by" not included: this information will appear below the establishment name and if applicable, below rule #2 and #4.
- "by" include: the information will appear before the establishment name
- Formatting:
Once the sub header details are entered, the system will display sub header details for each manufacturer and distributor as shown in Figure 36 and Figure 37 below.
Figure 36: Subheader Information
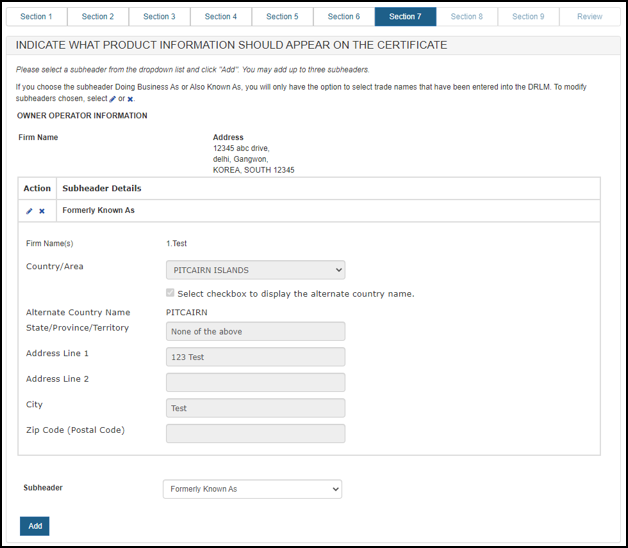
Figure 37: Subheader Information
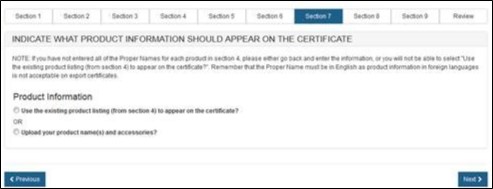
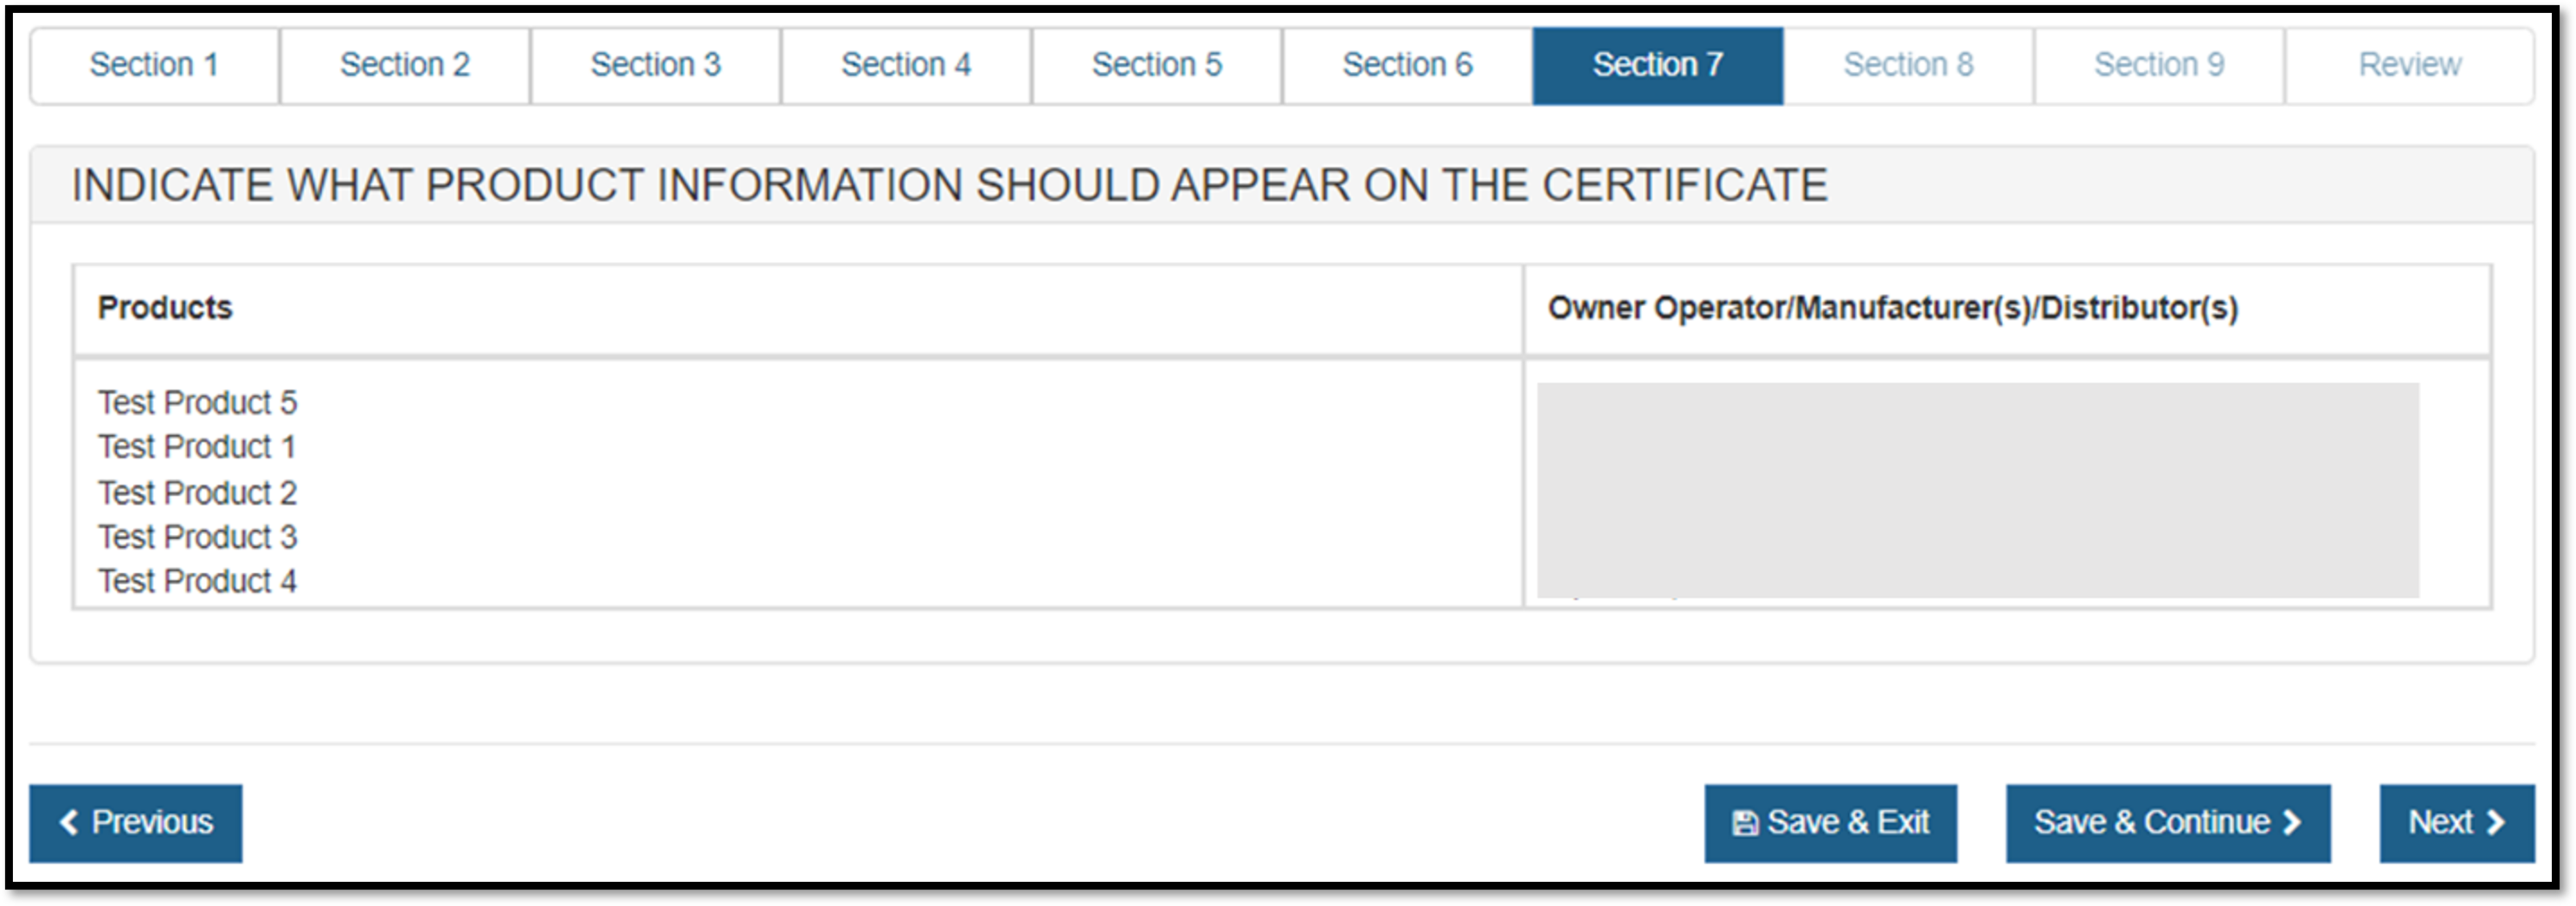
Indicate What Product Information Should Appear on the Certificate
There are 2 ways to identify the names of the products to be included on the certificate (see Figure 38):
- Select "Use
Existing Product Listing (from section 4) to appear on the certificate" to
utilize the product's proper name as entered in section 4. NOTE: If a proper name
was not entered, please go back to section 4 and enter the proper name or
choose to upload a product list. This option is best if there are only a
couple devices with short names.
OR - Select "Upload your product name(s) and accessories". This option is best if there are many devices or models with long names.
Figure 38: Existing Product Listing or
Upload
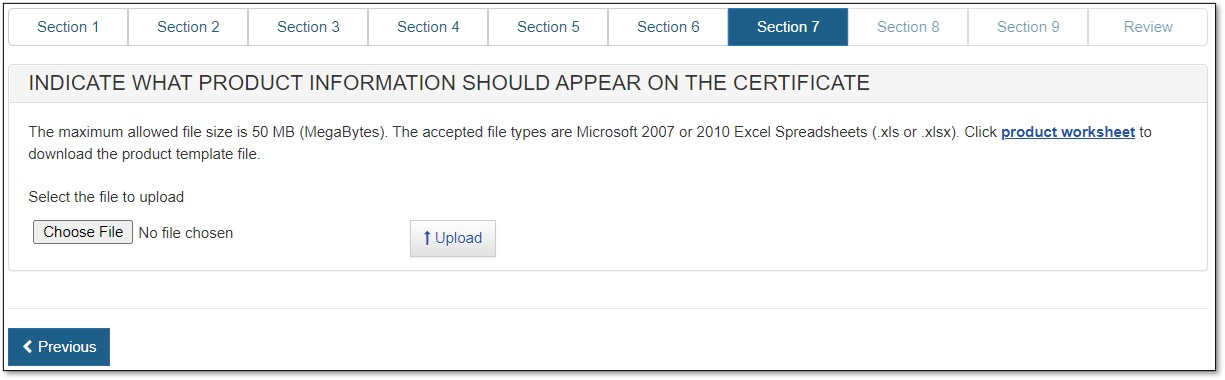
Upload Product List (File)
To upload your product list (File), click on the "product worksheet" hyperlink (as shown in Figure 39) to download a template which is in a format that must be used to upload your products.
Figure 39: Upload Hyperlink and Browse
Type or copy your product list onto the template. Please read the Tips below first.
Tips for uploading products
Please adhere to the following rules or the system will not accept the upload:
Concatenation – creating the appearance of multiple columns within a one column format.
For example, a company may store product information in a spreadsheet like this:
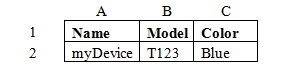
Using concatenation functions a company
might use a function in another column such as
=A2&" - "&B2&" - "&C2
This takes the values found in the cells A2, B2, and C2 and puts them together
in a single cell with dashes (which can be changed to any type of separating
text desired). The quotes around the dashes indicate that the text (and spaces)
between the quotes are actual text to be displayed rather than a reference to a
cell or function in the spreadsheet. This is the result of adding the function
to cell D2:

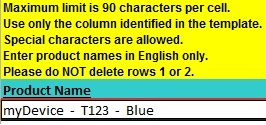
Now that the cells with various product information have been concatenated, the concatenated information needs to be moved into a spreadsheet conforming to the CECATS template spreadsheet which is a single cell. Though the concatenation function displays the concatenated text, if this cell is copied to another spreadsheet the result will likely be an error displayed in the cell. This error occurs because the displayed concatenated text is still a function which requires the cells referenced in it to exist in the proper locations.
Once the function is moved to a location where those referenced cells no longer exist, the function will not behave as expected. To copy the displayed concatenated text to the CECATS template spreadsheet, copy the text but when pasting the text, the option to past only values should be used. In Microsoft Excel, the option to paste only the values that are a result of a function is found in the Paste or Paste Special options. Pasting only values will allow concatenated text to appear correctly in the CECATS template spreadsheet:
When the product list is ready and saved to your computer, click "Browse…" and navigate to the location of your file and click "Upload". The uploaded products and accessories will be ready for grouping.
NOTE: The order of the products displayed on the certificate will be the same order of the products entered in Section 4 or on the product template upload file.
Grouping a Product(s) to a Facility(ies)
Products can be grouped to one, some or all of the facilities to be displayed on
the certificate.
NOTE: The associations you create will impact the printout of your certificate.
NOTE: There is a checkbox located at the top-left section of the Products table. If this box is checked, all products will be selected for that particular page.
"Group All Products to All Facilities" button
The "Group All Products to All Facilities" button provides a quick and
easy way to group all products to all facilities with a single click.
Figure 40: Group All Products
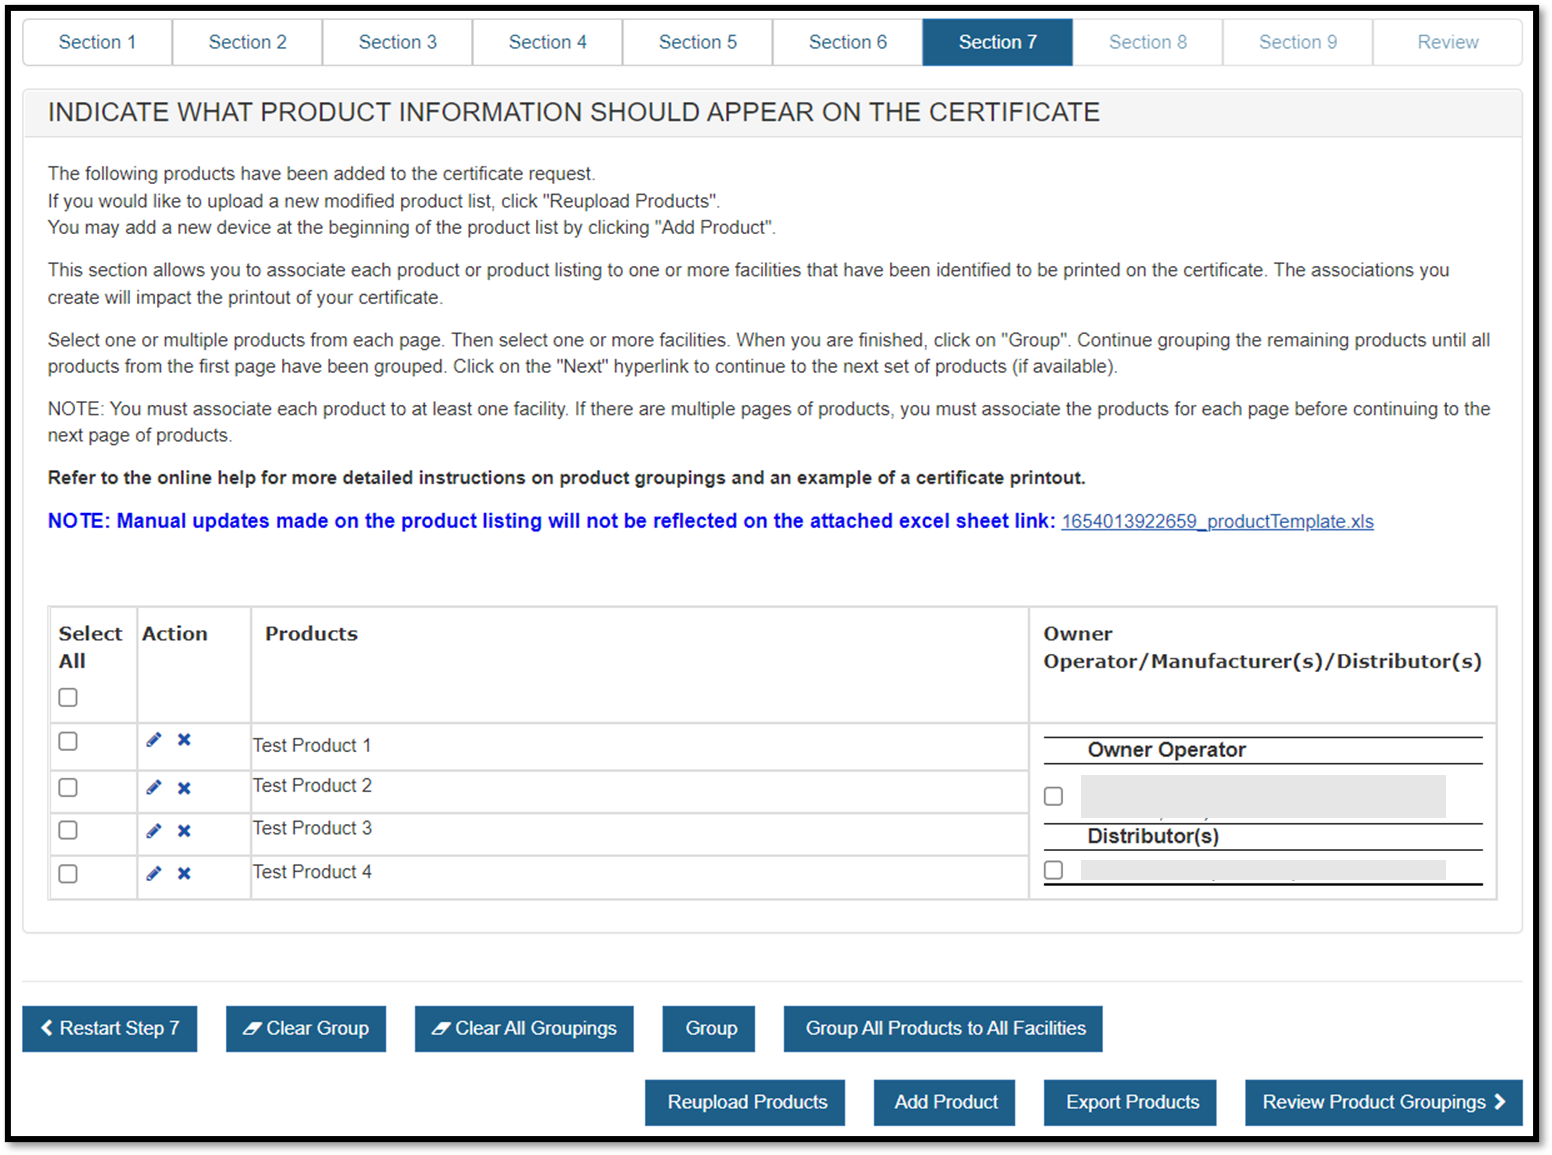
"Group" Button
Select one or multiple products from the list of products. Then select one or
more facilities located to the right of the product listing. When finished,
click on the "Group" button.
The grouping just created will be displayed as shown in Figure 41 below.
The system continues to display the product listing (below the grouping). Products that have been "grouped" will now be grayed out. Continue grouping the remaining products until all products on the page have been grouped.
"Add Product" button
You may add a new device at the beginning of the product list by clicking
"Add Product". Click on "Add product", enter the Product
Name and select "Next". The new product will be displayed at the
beginning of the product list.
Figure 41: Grouping
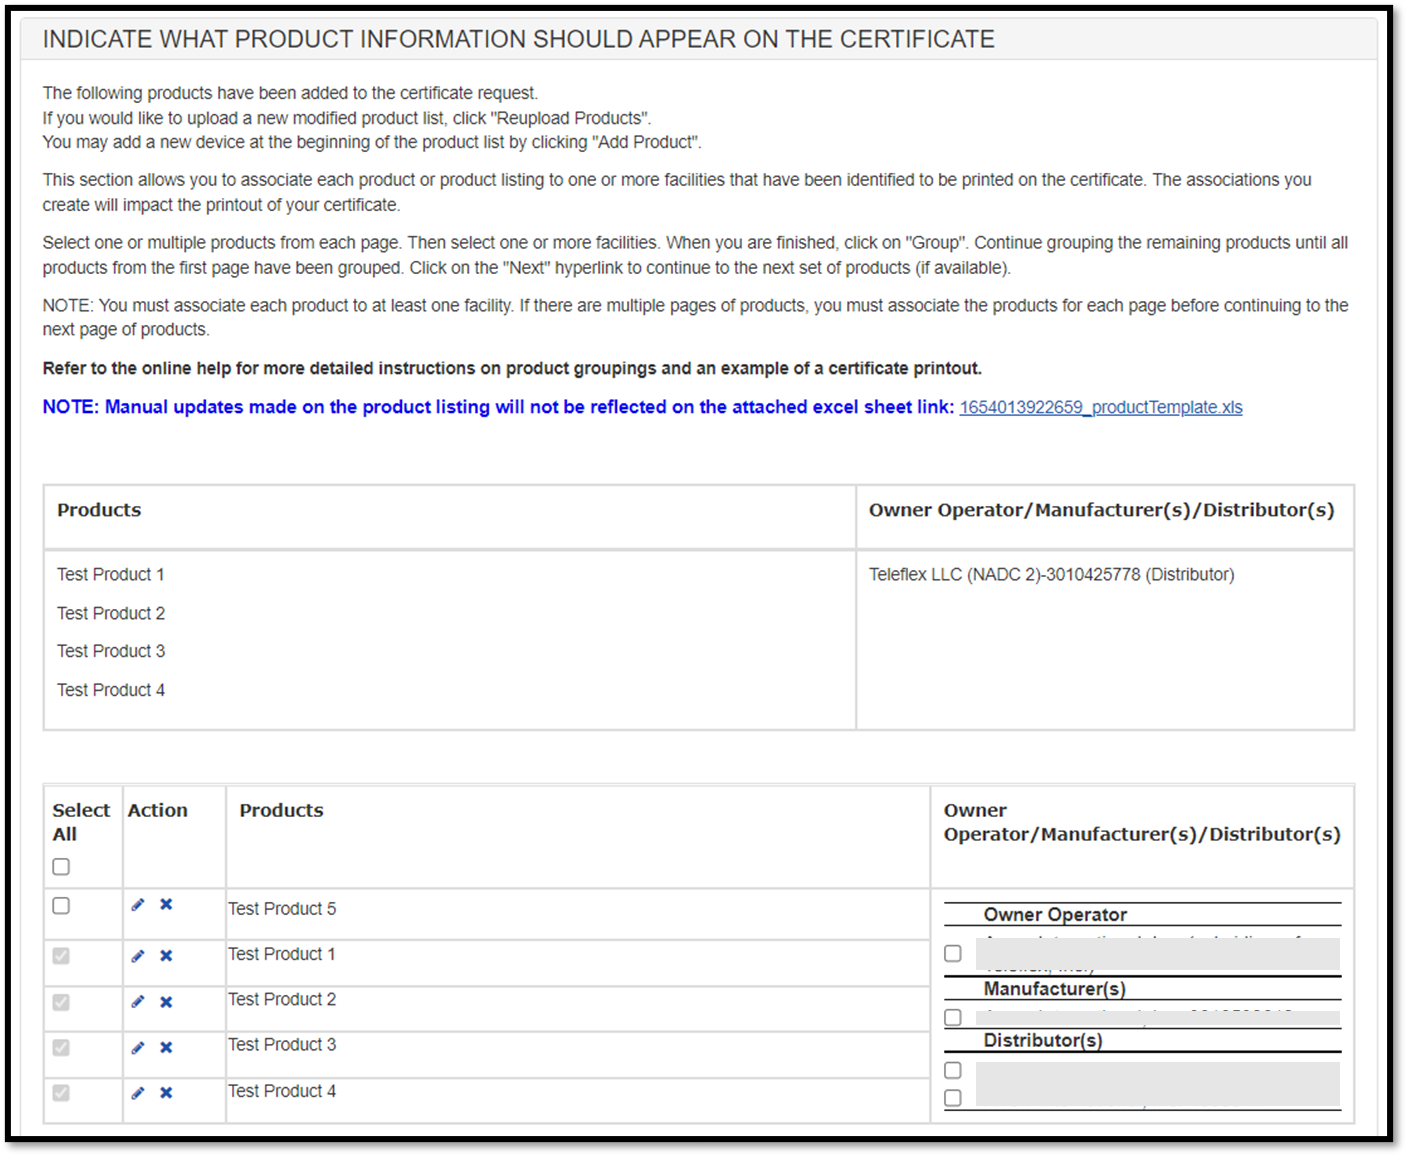
NOTE: All products on the page must be grouped before moving to the next
page of products.
Once you have grouped all products on that page, click on the "Next" button to continue grouping additional products. Continue until all products on all pages have been grouped.
"Clear Group"
If an error was
made when grouping, select "Clear Group" to restart grouping for that
particular page.
NOTE: The "Clear Group" button will NOT affect any other pages (if more
than 30 products).
"Clear All Groupings": will remove ALL groupings from all pages. A warning message will be appear prior to clearing all groupings. Once confirmed, you will have to start the grouping process.
"Reupload Products" if changes to the product list are required after the initial product upload, click "Reupload Products" and all products and groupings will be removed. A warning message will appear prior to clearing the product listing. Once confirmed, upload a new product list. See Upload Product List (File) above.
"Restart Step 7" If for any reason you need to restart section 7, click on The "Restart Step 7". A warning message will appear prior to restarting step 7. Once confirmed, the system will navigate back to the start of step 7.
Warning: All information will be deleted if you click on the "Restart Step 7" including the Primary Manufacturer, Owner Operator Address, and all identified facilities to be displayed on the certificate, Header and SubHeader selections, and the product listing.
Once all products have been grouped to a facility or facilities, the product groupings will be displayed for review as shown in Figure 42 below
Figure 42: Grouping Review Page
Click "Next".
Section 8 – Should the country destination be listed on the certificate?
Unless otherwise indicated in this section, the certificate will be state "into foreign countries." Sometimes a specific destination country name is desired. To have a specific country appear:
- Identify only the specific country in section 6.
- Select "Yes" to the "Should the country destination be listed on the certificate" in section 8.
NOTE: If this option is greyed out and cannot be chose, most often it is due to more than one country selected in section 6.
Enter the total number of certificates requested. See Figure 43 below.
Figure 43: Number of Certificates
Requested
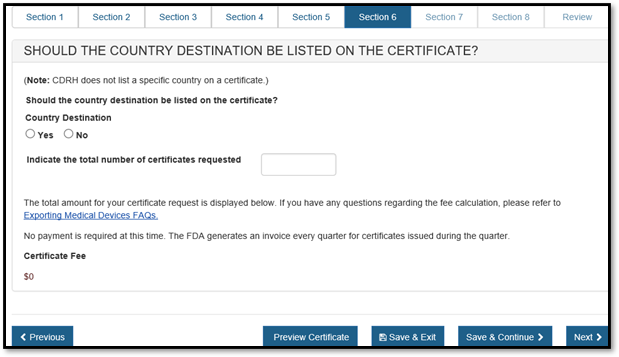
The total fee will be displayed as shown in Figure 44.
NOTE: The FDA will invoice your firm quarterly for all certificates issued during the quarter.
Figure 44: Total Fee

Section 9 – Exporter's Certification Statement (ECS)
The Exporter's Certification Statement (ECS) acknowledges that you, the responsible official or designee, certify that the facility(s) and the products identified on the Supplemental Information are, to the best of your knowledge, in substantial compliance with the Federal Food, Drug, and Cosmetic Act (FD&C Act) – as well as all applicable or pertinent regulations.
In this section, the primary facility field will be auto-populated based on the selection you made in section 7. You must select the "I Agree" button located at the bottom of this section and enter your name and title. You will not be able to continue with the application until these fields have been completed. See Figure 45 below:
Figure 45: ECS
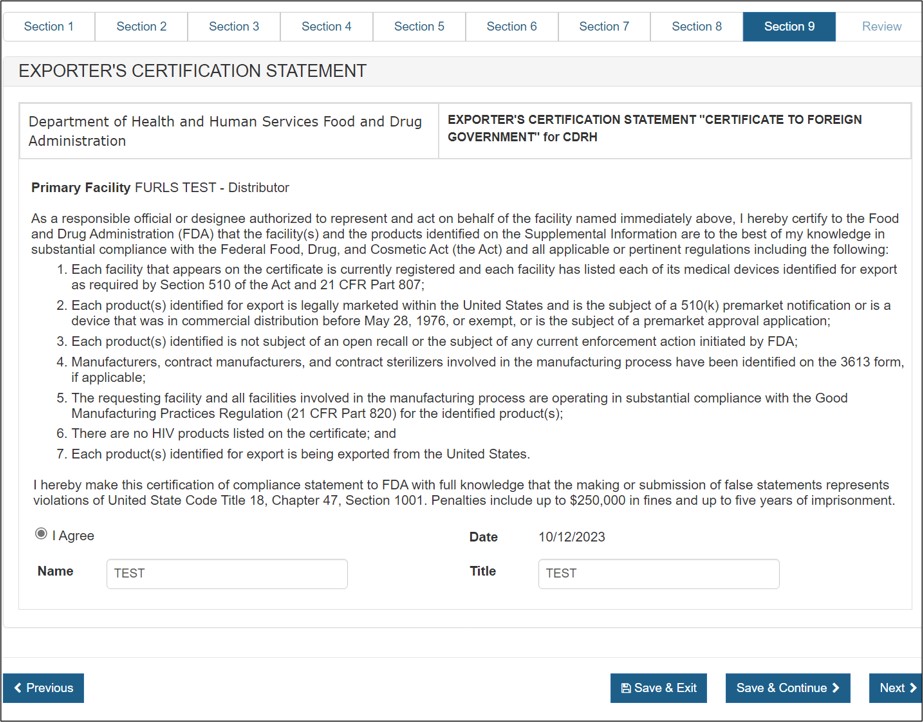
Once these fields are completed, click "Next" to navigate to the final review page.
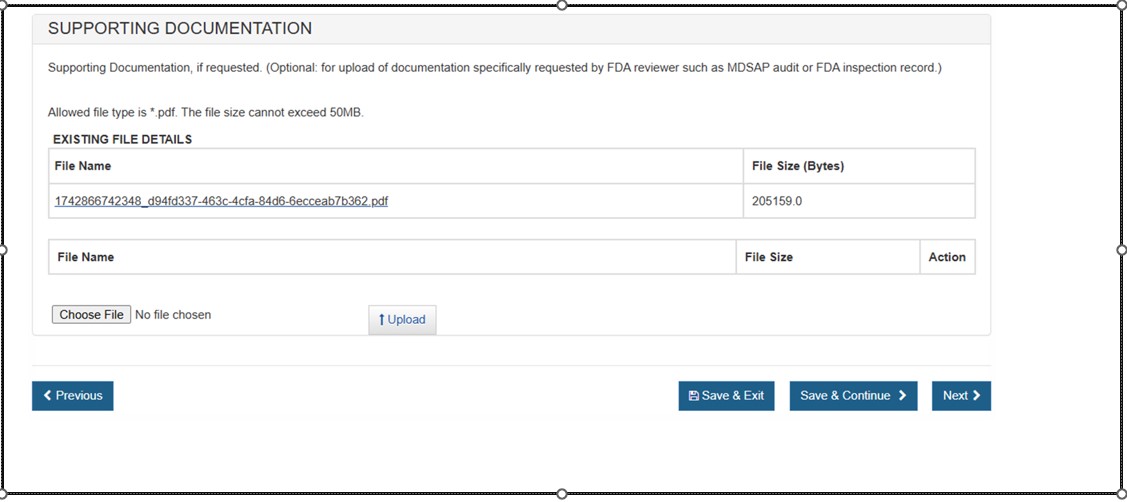
Supporting Documentation
Use this section to upload any documents specifically requested by an FDA reviewer (e.g. MDSAP audit or FDA inspection record). See Figure 46 below.
NOTE: This section is not required. Only PDF files less than 50MB will be accepted.Figure 46: Supporting Documentation
Final Review Screen
The entire application broken out by section will be displayed as shown in Figure 47 below. You may choose to modify a section by selecting the "Edit" button next to the section to be updated. The data entered in the chosen section will be displayed and changes may be made as needed.
NOTE: The system displays one entry in
each section. If you entered multiple entries in a section, (i.e. Multiple
manufacturers or distributors in section 2 or 3), Click ![]() to expand
the list for that section.
to expand
the list for that section.
Figure 47: Final Review Page
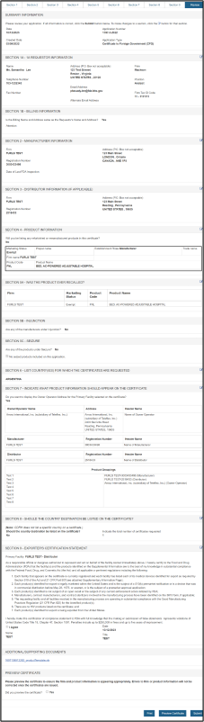
PREVIEW THE CERTIFICATE!!! To ensure that the facility name and address is appropriate, headers, subheaders, product list and groupings appear as preferred, click "Preview Certificate". If any changes are required, return to the appropriate section and update prior to continuing onto Section 9 to submit. Please see Figure 47 above.
This will be your final opportunity to make edits to some sections, so please review your completed application carefully.
NOTE: Your submission is not complete until you click "Submit".
Print Application: You may choose to print your application prior to submission using the "Print" button at the bottom of the page, however, unless you have previously saved the application, the application number will not appear on the printed application. There will another opportunity to print the application after it is submitted and has an application number assigned.
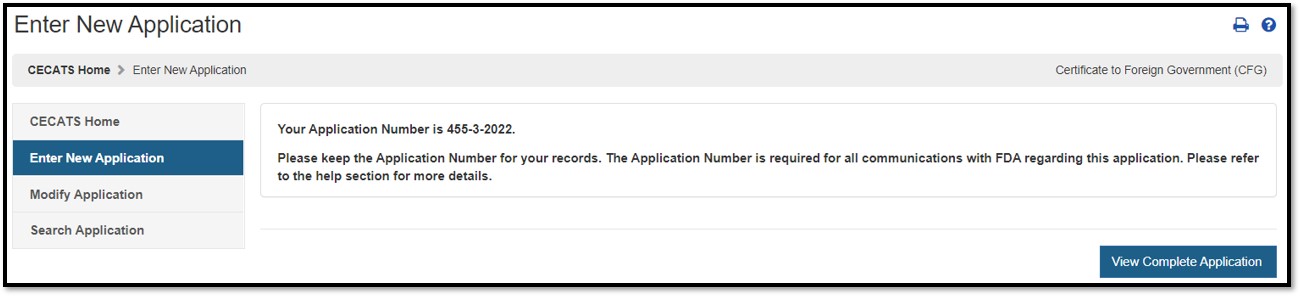
Submission: When your application is ready for submission, click "Submit". A message that your application was successfully submitted will appear as shown in Figure 48 below. An application number will be displayed and the opportunity to print a copy of the application is available. Please save the application number for future reference. The application number will be required to check the status of your application. You will also receive an email confirmation that your application has been successfully received along with the application number.
NOTE: The order of the facilities on the final certificates may not be the same as the sample.
Figure 48: Submission Success Page