Create a Non-Clinical Research Use Only Certificate Application
April 2025
Table of Contents
- Create a Non-Clinical Research Use Only (NCR) Certificate Application
- Navigation
- Section 1 Requestor Information
- Section 2 Manufacturer Information
- Section 3 Product Information
- Section 4 List country(ies) for which the Certificates are requested
- Section 5 Should the country destination be listed on the certificate?
- Section 6 Exporter's Certification Statement
- Final Review Screen
Create a Non-Clinical Research Use Only (NCR) Certificate Application
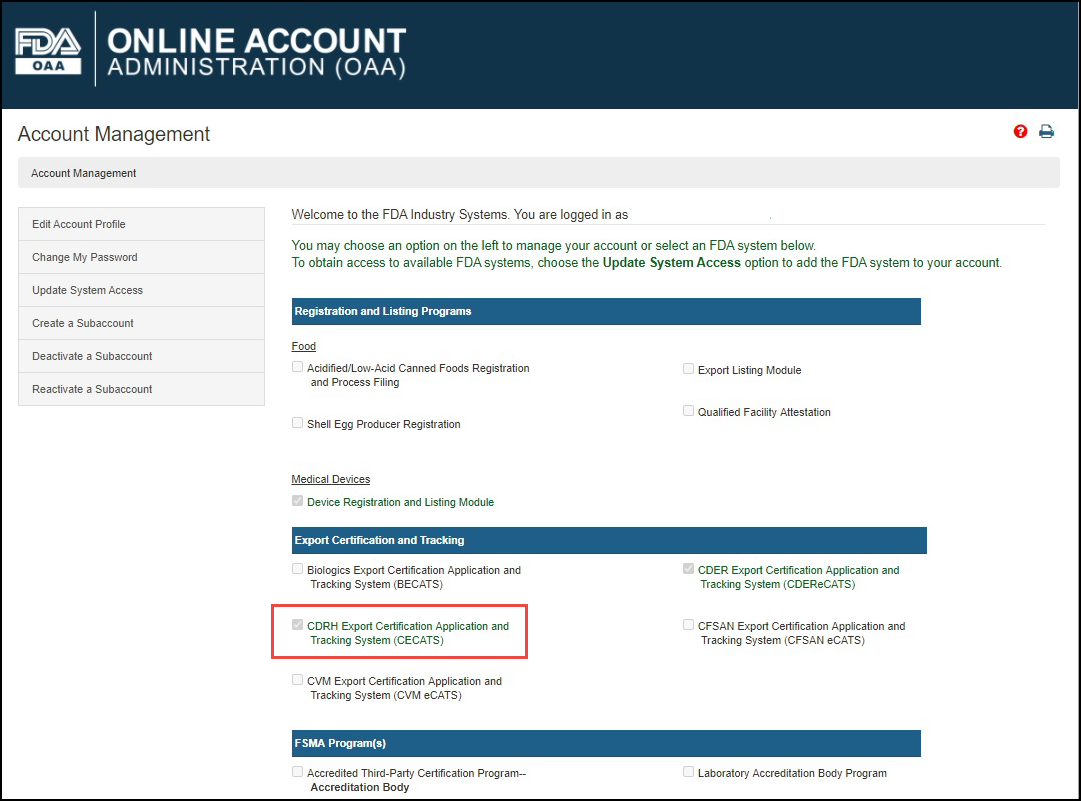
Log into the FDA Industry Systems (FIS) https://www.access.fda.gov and select "CDRH Export Certification Application & Tracking System" (CECATS) from the list of systems available on the FURLS "Home" page, as shown in Figure 1.
Figure
1:
FDA Industry Systems Page
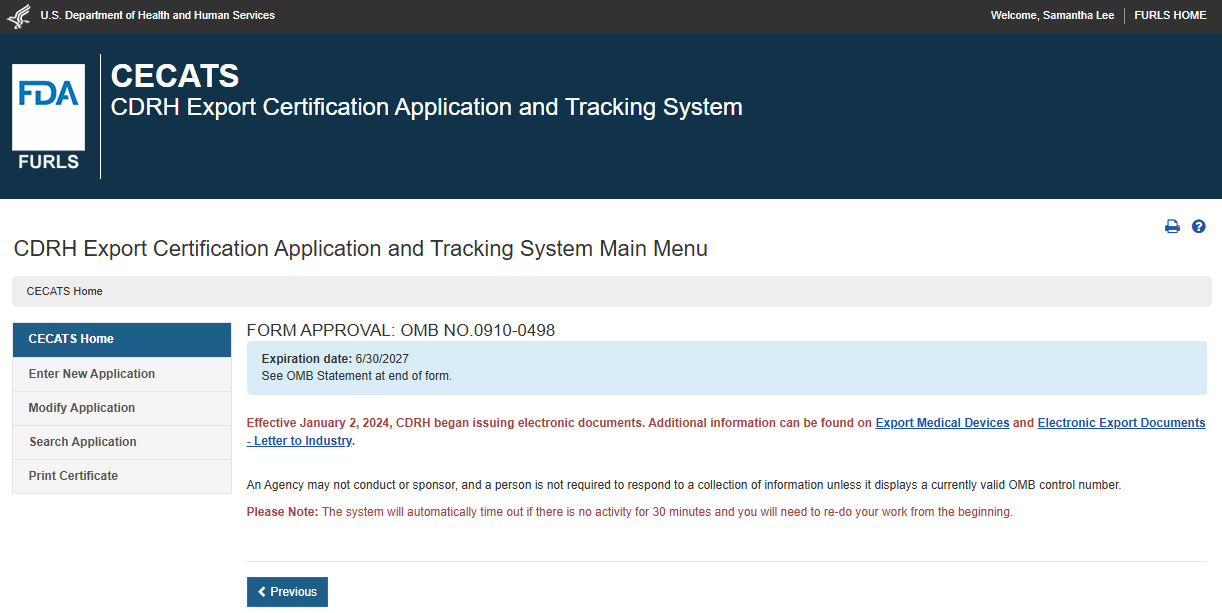
Select "Yes" in response to the question "Will the devices be exported from the United States?". Select "Continue" and the system will open the CECATS "Home" page. The CECATS Main Menu page is shown in Figure 2 below.
Figure
2:
CECATS Main Menu
To create a new application, click "Enter New Application". All applications that you have saved or submitted will be displayed, as shown in Figure 3 below. Applications that are saved, but not submitted will be in "Draft" status until you submit them.
- To create a new application, click "Enter New Application" from the main Menu page. Select "Enter New Application" again.
- To continue working on a draft
application,
click the Pencil icon
 (Edit
icon) next to the desired application.
(Edit
icon) next to the desired application. - To clone a
previous application, click on the double book icon
 (Clone
icon) associated to the desired application.
(Clone
icon) associated to the desired application. - Verify the information on each page is still correct and proceed through each of the sections.
Click "Modify Application" to
makes changes to a submitted, but not yet in Under Review status.
The following options are available:
- Modify application based on a notification received
- Change the number of certs
- Cancel request
To search using the application number, click Search Application. This option may be used to continue working on a draft application, to clone a previous application, or to make corrections to an application that is in 'Return for Action' status.
NOTE: Return for Action status indicates that upon review of the application by the FDA, additional information or clarification was required. CECATS will send an email to the requestor with comments from the reviewer and will provide a 48-hour window for modifications to be made. If modifications cannot be made within 48 hours, the status will automatically change to "Incomplete". Please clone the application when ready, modify and submit. A new application number will be assigned. No charges are incurred for an application unless certificates are issued.
NOTE: For all applications in a "Draft" status, if you do not perform any activity within 30 days, the status will automatically change to "Not Submitted". Please clone to continue the application.
Figure
3:
Submitted and Draft Application View

The Center for Devices and Radiological Health (CDRH) issues several types of Export documents. When creating a new application, select the application type to be requested, as shown in Figure 4.
Figure
4:
Application Types
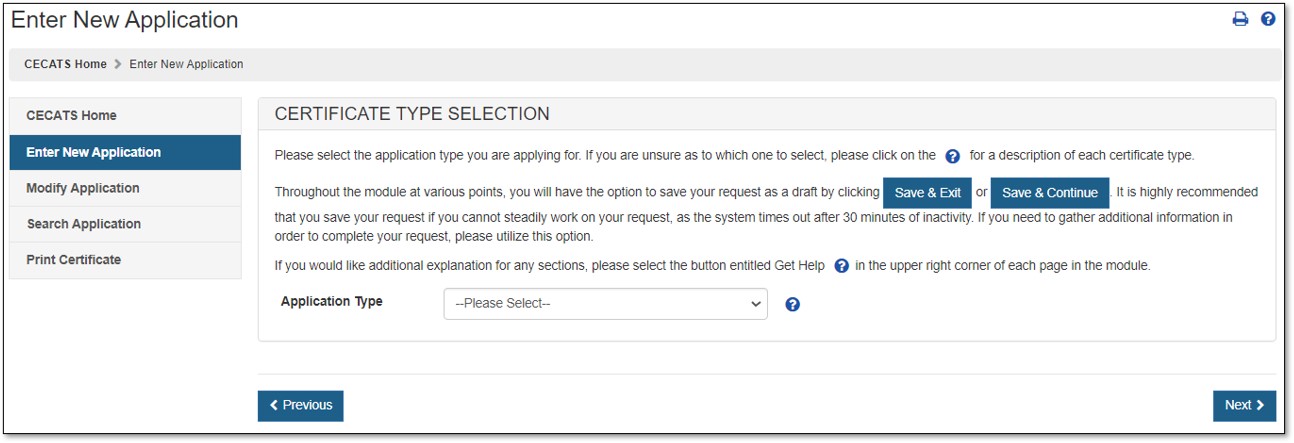
Select "Non-Clinical Research Use Only" from the dropdown list.
About NCR Certificates
For a
description of each application type, select the blue question mark ![]() icon located
next to the application type list, shown in Figure 4 above.
icon located
next to the application type list, shown in Figure 4 above.
The NCR Certificate is for the export of a non-clinical research use only product, material, or component that is not intended for human use which may be marketed in, and legally exported from the United States under the Federal Food, Drug, and Cosmetic Act (FD&C). Among the requirements to be met prior to the issuance of this certificate are the following:
- The "Non-Clinical Research Use Only" certificate is for product(s), material(s), or component(s) that are not used to prevent, treat, or diagnose human disease.
- The manufacturing facility is required to label these products according to 21 CFR 809.10(c)(2)(i) or 21 CFR 312.160, as appropriate.
- All products listed on NCR Certificate must be exported from the U.S.
- Each NCR Certificate request must be requested by the U.S. manufacturer. Requests received from a foreign firm will not be considered. A U.S. firm must appear on each NCR Certificate.
- All contract manufacturers and contract sterilizers involved in the manufacturing process must be identified on the 3613c form, regardless of whether or not they will appear on the certificate.
Navigation
A status bar at the top of every page will track your progress through each step of the application process, as shown in Figure 5 below.
Figure
5: Navigation Bar

A "Get Help" icon, located at the top right of each page, will provide page specific help. For an overview of all help files available, please refer to the FDA Industry Systems Index of Help Pages at https://www.access.fda.gov/cecats/help/cecats-ncr-guide.html.
Also located the top right corner of each page is a "FURLS HOME" link that will take you to the FURLS "Home" page. The "CECATS HOME" link will take you to the CECATS "Home" page (Refer to Figure 2). To log out of the system, select "FURLS HOME" and click on Logout.
At the top and bottom of each screen are navigation buttons, as shown in Figure 6 below.
Figure
6: Navigation Buttons
![]()
- Previous – Navigates back one screen or back one step. Information entered on the current screen will NOT be saved if you select the "Previous" button.
- Save & Exit – Information entered up to this point will be saved. Your application will be set to a "Draft" status until you complete and submit the application. If you do not perform any activity for 30 days, the system will automatically change the status to "Not Submitted" and may delete the application. When you log into the CECATS system, all applications in a "Draft" status will be displayed after selecting the "Enter New Application" option from the main menu.
- Save & Continue – Information entered up to this point will be saved in "Draft" status. An application number will be assigned when you click on the "Save & continue" button the first time. This number will be visible on the top of the screen until the application is submitted. Please keep the Application number for your records and for any communications with FDA regarding this application. Your application will be set to a "Draft" status until you complete and submit the application. If you do not perform any activity for 30 days, the system will automatically change the status to "Not Submitted" and may delete the application.
- Next – All information is saved on the current screen and navigates to the beginning of the next step. However, exiting CECATS without using the "Save & Exit" button will cause the loss of the entire request.
NOTE: All Fields are mandatory except those marked as "Optional" in parenthesis. You will NOT be able to proceed to the next step or "Save & Exit" until all mandatory fields have been properly entered on the current screen.
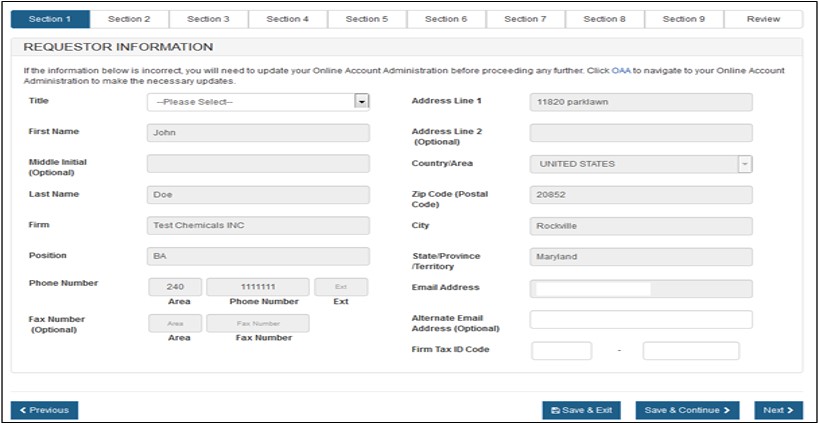
Section 1 - Requestor Information
The system auto-populates specific information from your Online Account Administration (OAA) into section 1 (Requestor Information) of the application. These fields cannot be edited in CECATS.
If the information is incorrect, click the "FURLS Home" link. Then click "Edit Account Profile" on the left-hand side and update your account profile accordingly.
The following two fields are required in section 1:
- Title
- Firm Tax ID Code (also referred to as the Employer Identification Number or EIN (a nine-digit numeric value). This number is assigned by the Internal Revenue Service (IRS).
Click "Next". See Figure 7 below.
Figure
7: Section 1 - Requestor Information
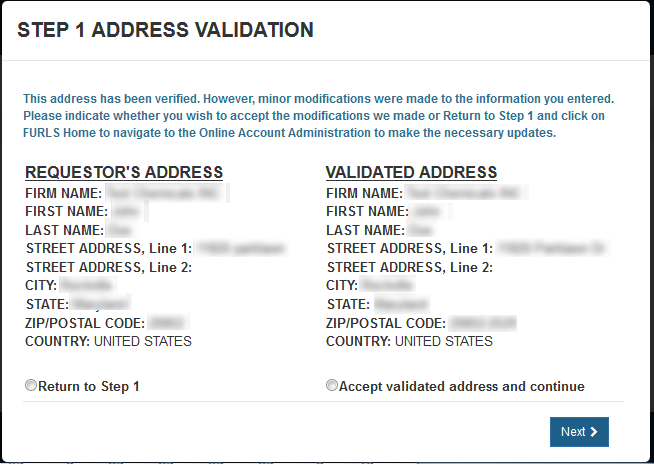
On the next screen, you will need to
validate your address. NOTE: This address is the requestor's address; It is not used
as the facility address on the application or for shipping.
Click "Accept validated address and continue" and click "Next"
to proceed to Step 2. See Figure 8 below.
Figure
8: Address Validation
Section 2 - Manufacturer Information
In section 2, you are required to provide information on your manufacturing facility. The system prompts whether you have registered the facility with the FDA via the Device Registration and Listing Module (DRLM), as shown in Figure 9 below.
Figure
9:
Registered Facility
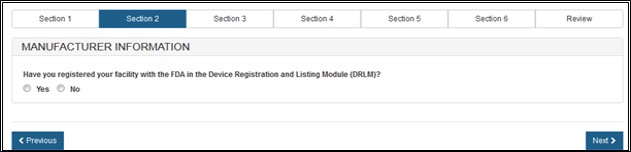
Facilities Registered in DRLM Flow
If the facility is registered, select "Yes" and click "Next". Enter either the Registration Number or Owner Operator Number (OON), as shown in Figure 10 below.
Figure
10:
Registration Number or OON
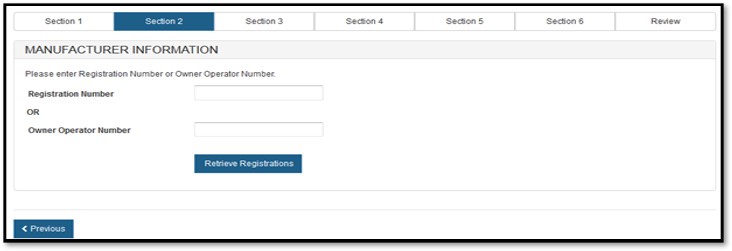
NOTE: You must enter a valid number in either field. If you cannot provide a valid number, you will not be able to continue with the application process and you must select "Previous" and select "No", as shown in Figure 9 above.
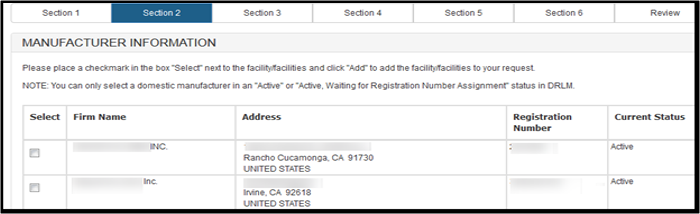
Entering a Registration Number
If you enter a (valid) registration number, the facility information including
the Firm Name, Address, Registration Number, and Current Status will be
displayed as shown in Figure 11 below.
Figure
11:
Display of Facility Information for entered Registration Number
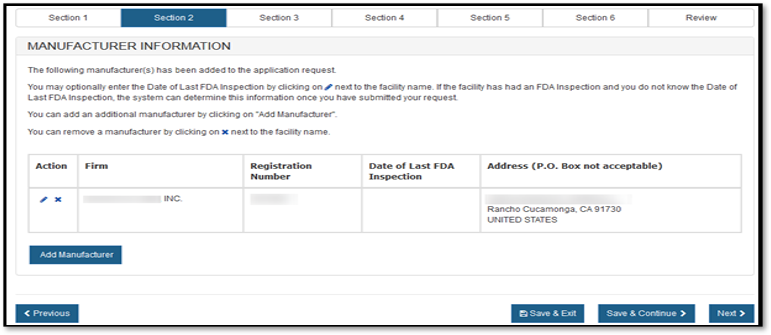
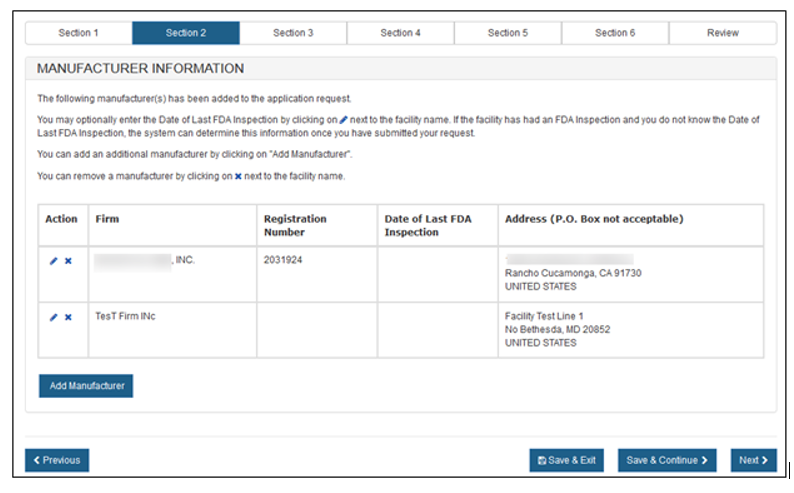
Click "Add". The facility added to the application will be displayed as shown in Figure 12 below.
Figure
12:
Summary of Facility or Facilities added to the application
You have the ability to perform the following:
- Add up to a maximum of three facilities per application by clicking on the "Add Manufacturer" button.
- Remove a facility from the application by clicking the "X" icon (Delete).
- Optional: Update the "Facility Date of Last FDA inspection" by clicking on the Pencil icon associated to a Firm.
Click "Next".
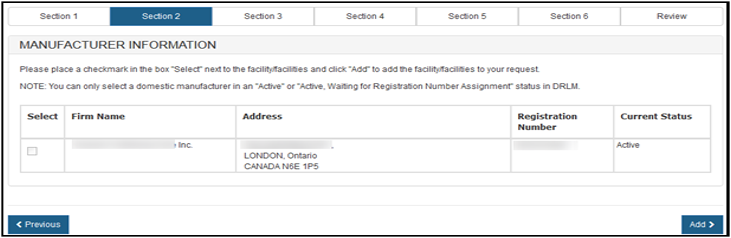
Entering an Owner Operation Number (OON)
As long as the OON is active, a list of all facilities associated with the OON will be displayed. Select one or more facilities (if applicable) from the list of manufacturers that are in active status as shown in Figure 13. Inactive facilities will be grayed out and cannot be selected.
Figure
13:
Display of Facility Information for entered OON
NOTE: You will only be able to select a facility if the following conditions are met:
- Domestic Address
- Active Status or Active Pending Registration Number Status.
Once you have selected the facility or facilities involved, click "Add".
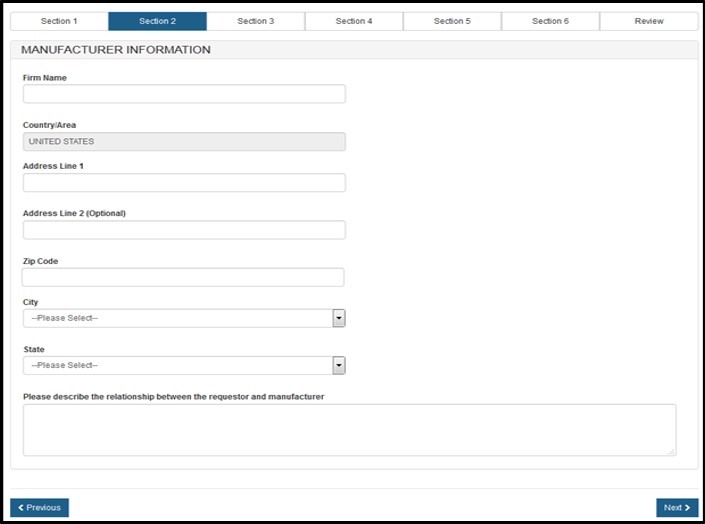
Facility that has NOT been registered in DRLM Flow
If the facility is not registered, select "No" and click "Next" (Refer to Figure 9 above).
Enter the Manufacturer name and address as shown in Figure 14 below.
Figure
14:
Enter Manufacturing Information
Once you have completed entering the
facility information, and click "Next"
OR
If you select "Yes" and click "Next", the system displays the facility
added to the application as shown in Figure 15 below.
Figure
15:
Summary of Facility added to Application
NOTE: If the manufacturer is the same as the requestor, then you will not have the option to "Edit" any information in this screen as shown in Figure 15 above.
Once you have entered your facility or facilities, click "Next".
Primary Facility: The primary facility is the facility which you represent. The primary facility must be a U.S establishment.
Click the
![]() icon to
view a list of all U.S. facilities entered as shown in Figure 16. Select
the name of the facility that you represent.
icon to
view a list of all U.S. facilities entered as shown in Figure 16. Select
the name of the facility that you represent.
NOTE: By selecting the facility that you represent, CECATS will pre-populate the facility name in the Exporter's Certification Statement which you will sign towards the end of the application.
Figure
16:
Primary Facility
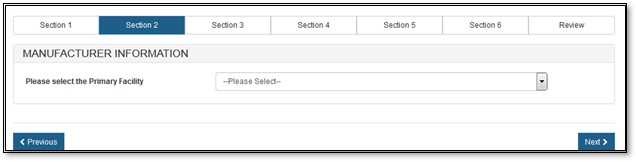
Once you have selected the Primary Facility, click "Next".
Select the facility/facilities to be displayed on the certificate as shown in Figure 17 below. Click "Next".
Figure
17:
Facility to be displayed on the certificate
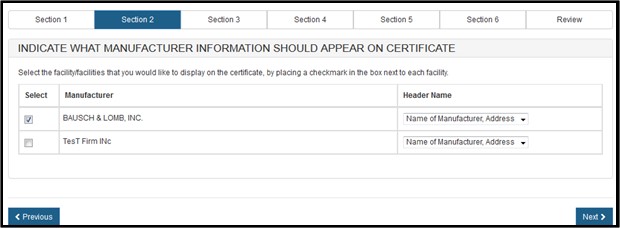
NOTE: You must select at least one manufacturer to appear on the certificate.
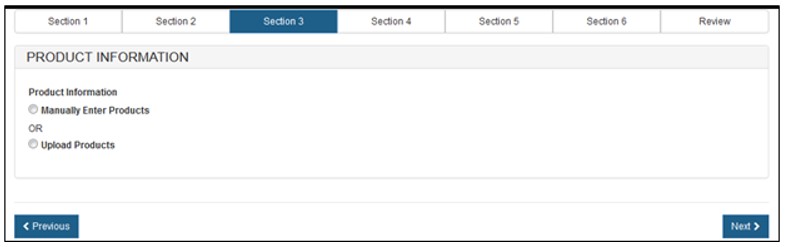
Section 3 - Product Information
In this section, you will be able to add one or more products to the application.
Prior to selecting the products, identify whether you want to manually enter the products OR to upload your products as shown in Figure 18 below.
Figure
18:
Entering Product Information
Manually Enter Products
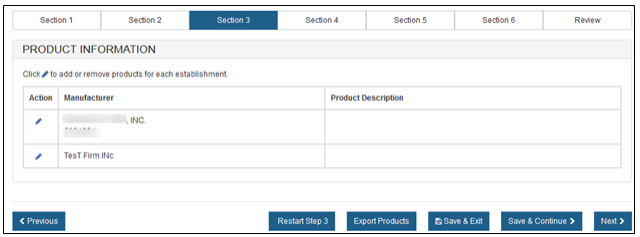
If you select "Manually Enter Products", all manufacturers selected in section 2 will be displayed as shown in Figure 19.
Click
Pencil icon ![]() to add products
for each establishment.
to add products
for each establishment.
Figure
19:
Select Facility
Enter the product description and click "Add" as shown in Figure 20.
Figure
20:
Product Description
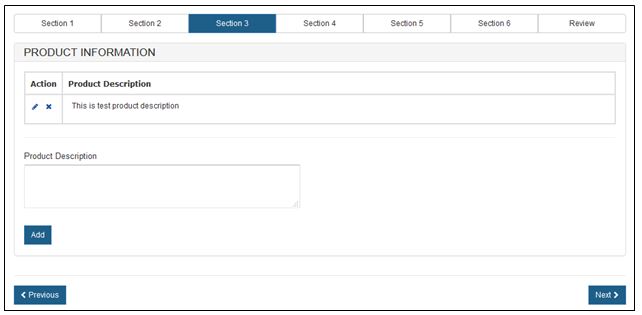
Repeat until products have been added for the specified facility. Click "Previous" button to return to the Product Information page as shown in Figure 19 above.
Repeat the steps for adding products for each facility (if applicable). Once you have completed adding products, click on "Next".
NOTE: You must enter at least one product for each facility before continuing to the next step.
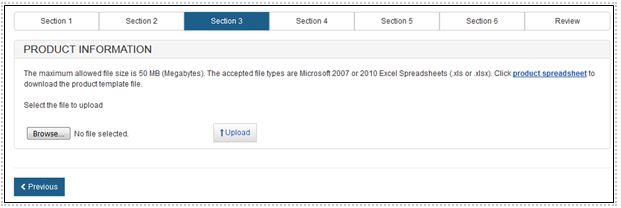
Upload Products
To upload your product, click on the "product worksheet" hyperlink as shown in Figure
21 to download a template which is in a format that must be used to upload
your products.
Figure
21:
Upload Attachment
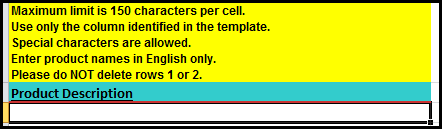
Type or copy your product list onto the template. Please read the Tips below first.
Tips for uploading products:
Please adhere to the following rules or the system will not accept the upload:
- Rows 1 and 2 must not be deleted. (Product names typed on rows 1 and 2 will not appear on the certificate).
- Do not separate products with any blank rows. CECATS will automatically delete these blank rows on the certificate. Grouping of products can be achieved by entering a dot or dash on the line in between the group. This dot or dash will appear on the certificate.
- Do not exceed the maximum character limit of 150 per cell.
- Once loaded into CECATS, the characters are displayed on certificates in size 8, Arial font.
- There is a single cell available for each product name with CECATS allowing each cell to be up to 150 characters. If you would like the appearance of columns within the one column format, a process called concatenation can be utilized. This can be accomplished using spreadsheet software such as (Microsoft Excel or Libre Office Calc) by concatenating multiple fields into a single field. Information on how to do this in Excel can be found in the Excel help. Basic concatenation instructions are provided below. For additional assistance, please contact FDA at cdrhcecats@fda.hhs.gov.
Concatenation – creating the appearance of multiple columns within a one column format.
For example, a company may store product information in a spreadsheet like this:
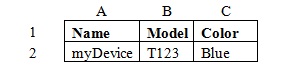
Using concatenation functions a company
might use a function in another column such as
=A2&" - "&B2&" - "&C2
This takes the values found in the cells A2, B2, and C2 and puts them together
in a single cell with dashes (which can be changed to any type of separating
text desired). The quotes around the dashes indicate that the text (and spaces)
between the quotes are actual text to be displayed rather than a reference to a
cell or function in the spreadsheet. This is the result of adding the function
to cell D2:

Now that the cells with various product information have been concatenated, the concatenated information needs to be moved into a spreadsheet conforming to the CECATS template spreadsheet which is a single cell. Though the concatenation function displays the concatenated text, if this cell is copied to another spreadsheet the result will likely be an error displayed in the cell. This error occurs because the displayed concatenated text is still a function which requires the cells referenced in it to exist in the proper locations. Once the function is moved to a location where those referenced cells no longer exist, the function will not behave as expected. To copy the concatenated text to the CECATS template spreadsheet, copy the text. When pasting the text, the option to only past the values should be used. In Microsoft Excel, the option to only paste the values that are a result of a function is found in the "Paste" or "Paste Special" options. Pasting only values will allow concatenated text to appear correctly in the CECATS template spreadsheet:
Once all of the products have been added to the template and the file is saved, click "Browse…" to navigate to the location of the file. Click "Upload". The product list will be displayed as shown in Figure 22.
Figure
22: Upload
products
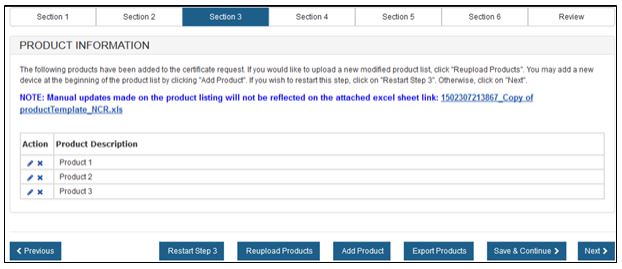
You can add a new device at the
beginning of the product list by clicking "Add product".
Once you have completed adding/uploading products, click "Next".
Section 4 - List Country(ies) for which the Certificates are requested
Select one or more countries to indicate the destination. Once you have selected the country or countries, select "Next" to proceed as shown in Figure 23.
NOTE: Another method to select a country (other than scrolling down the list) is to select a country from the country list, then enter the first few letters of the desired country name. The system will jump to the country that begins with the letters entered.
Figure
23:
List of Countries
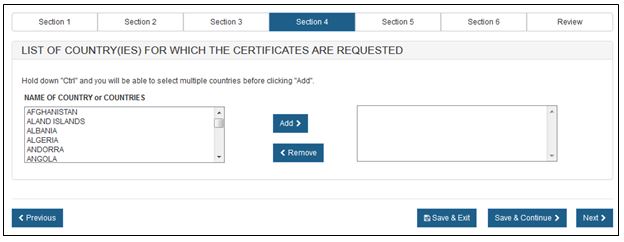
NOTE: The standard format of the electronic certificate will not display an individual country name but will state "foreign countries". To display a specific country on the certificate, select only one country in section 6 AND indicate that country destination should be listed on the certificate in section 8.
Click "Next".
Section 5 - Should the country destination be listed on the certificate?
If more than one country was selected in section 4, you will not be able to select "Yes" to display the destination country on the certificate. If you wish to display a specific country on the certificate, you must either go back to section 4 and select only one country or create a new application with the desired country. Otherwise, select "No".
Enter the total number of certificates requested. See Figure 24 below.
Figure
24:
Number of Certificates Requested
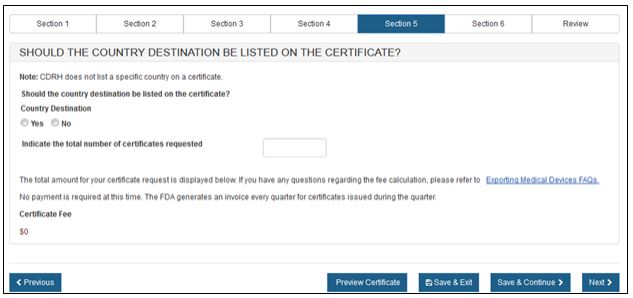
Add number of certificates requested, the system will calculate the total fee as shown in Figure 25.
NOTE: The FDA will invoice your firm quarterly for all certificates issued during the quarter.
Figure
25:
Certificate Fee Amount

Click "Next".
Section 6 - Exporter's Certification Statement (ECS)
The Exporter's Certification Statement (ECS) acknowledges that you, the responsible official or designee, certify that the facility(s) and the products identified in the "Supplemental Information" are (to the best of your knowledge) in substantial compliance with the FD&C Act and all applicable or pertinent regulations
In this section, the primary facility field will be auto-populated based on the selection you made in section 2. Select "I Agree" at the bottom of this section and enter your name and title. You will not be able to continue with the application until these fields have been completed See Figure 26 below:
Figure
26:
ECS Page
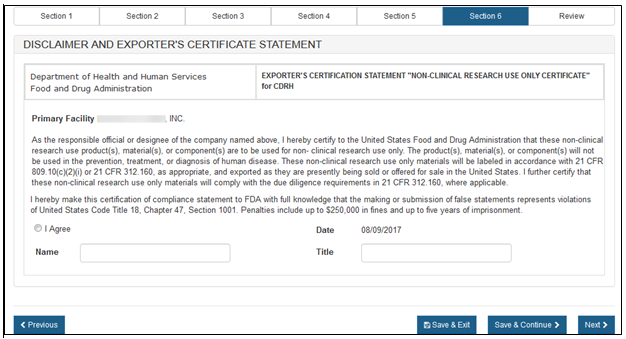
Click "Next" to proceed to the next Page.
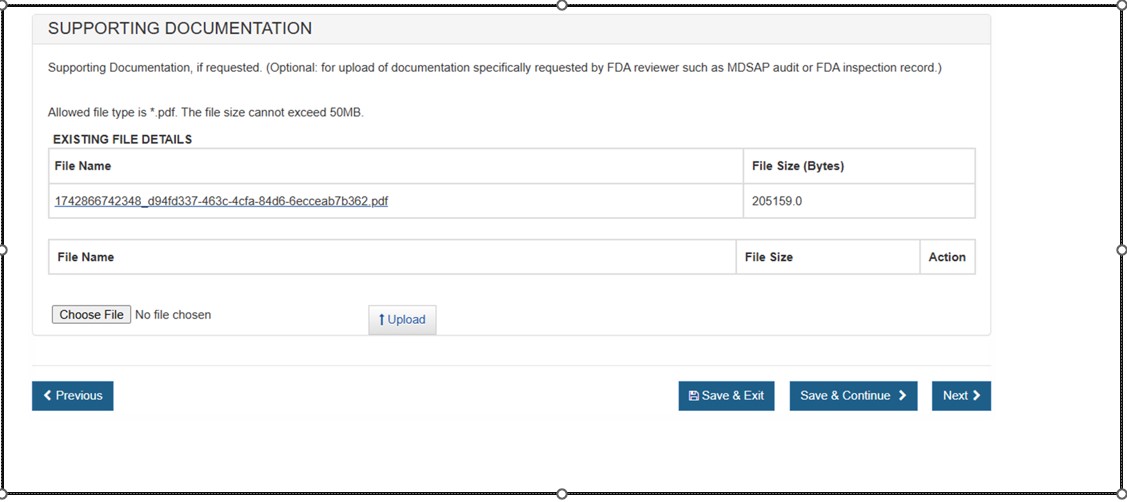
Supporting Documentation
Use this section to upload any documents specifically requested by an FDA reviewer (e.g. MDSAP audit or FDA inspection record). See Figure 27 below.
NOTE: This section is not required. Only PDF files less than 50MB will be accepted.Figure 27: Supporting Documentation
Final Review Screen
The entire application broken out by section will be displayed as shown in Figure 28 below. You may choose to modify a section by selecting "Edit" next to the section to be updated. The data entered in the chosen section will be displayed and changes may be made as needed.
Figure
28:
Final Review Page
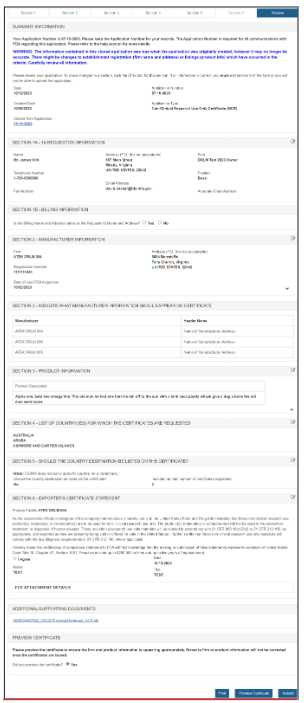
NOTE: The system displays one entry in
each section. If you entered multiple entries in a section (i.e., Multiple
manufacturers or distributors in section 2), click ![]() icon to
expand the list for that section.
icon to
expand the list for that section.
PREVIEW THE CERTIFICATE!!! To ensure that the facility name and address is appropriate, and that the headers, product list and groupings appear as preferred, click "Preview Certificate". If any changes are required, return to the appropriate section and update prior to continuing onto Section 6.
NOTE: The order of the facilities on the final certificates may not be the same as the sample.
NOTE: Your submission is not complete until you click "Submit".
Print Application: You may choose to print your application prior to submission using the "Print" button at the bottom of the page. However, unless you have previously saved the application, the application number will not appear on the printed application. There will another opportunity to print the application after it is submitted and an application number has been assigned.
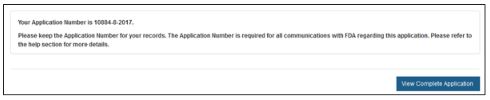
Submission: When your application is ready for submission, click "Submit". A message that your application was successfully submitted will appear as shown in Figure 29 below. An application number will be displayed and the opportunity to print a copy of the application is available. **Please save the application number for future reference. The application number will be required to check the status of your application. You will also receive an email confirmation that your application has been successfully received along with the application number.
Figure
29:
Submission Success Page